Click here for my verbose opinion on the pros and cons of straight-of-grain vs bias tape.
Click here for the yardage requirements for making bias tape.
Click here for the directions for making French/double-fold bias tape.
Straight of grain binding (whether single or double fold) is very economical, as you generally speaking are cutting crosswise (from selvage to selvage), although sometimes, if you are intentionally using a border print, you might be cutting lengthwise (oohh! that's a LOT of yardage there!). Straight of grain binding is also very simple to construct. It is best used on wall hangings or other items that will NOT be getting a lot of use.
Why? Well, when you fold straight of grain binding, you are exposing (theoretically) a single line of thread on the fold. Quilts that are loved to death or items like placemats (ask me how I know about *this* one) get *very* hard use on the edges and that line of thread(s) gets punished by wear. Over the years, through use and laundering, that folded edge *will* wear out and you will be left with two flapping edges instead of a folded binding. You can only use straight-of-grain binding on straight edges, not curved edges, of your quilt simply because the straight-of-grain binding won't "give", which is need to navigate the curves.
[Incidently that sort of hard wear is *the* single-most reason why one should never wrap the backing around to the front for a binding. Yes, it's easy to do, but if you ever have to replace the binding because it has worn through, you're going to have to replace that wrap-around binding with a separate binding anyway. I've also heard that judges will downgrade a quilt for having wrap-around binding, but that's a topic for another discussion.]
The point here is that quilted items that are going to get *used* (as opposed to simply being displayed) will rapidly wear out their binding if it's straight-of-grain.
So, what to do? Well, that's where bias binding comes in so nicely. Since the fabric is cut on the bias, you get a series of crossed threads at the fold instead of a single line of threads. The crossed threads will take the abuse of lotsa loving over time and not fray as quickly as straight-of-grain. You can use bias binding on both straight edges, as well as (obviously) curved edges. In fact, to belabor the point, if you have curved edges on your quilt, you *must* use bias binding if you want the binding to lay flat. You can ALWAYS use bias binding to bind a quilt, whereas there are limitations to where you can reasonably use straight-of-grain binding.
Now, the deal with the "double-fold binding" or "French fold binding" .. and heaven knows where *that* term came from ... that's just a binding that is double thickness but once folded in half and is treated just like single fold binding. The double thickness of bias fabric as binding serves to make this a *very* durable binding method, whether used on straight edges or curved ones. To use it, you align the raw edge of your quilt with the raw edges of the French fold binding (both of them) and sew a scant 1/4" seam. Fold the binding over the seam to enclose it, making sure the folded edge of the binding covers the seam line you just made. Topstitch or hand-stitch in place. You can start your sewing either on the front or back, as is your preference.
Personally, I like to sew first from the back and fold to the front, topstitching the binding in place. But then I don't hand-quilt, so that the line of topstitching doesn't look out of place on my quilts. It is a heck of a lot faster than hand-stitching the binding in place! But either way is acceptable ... mainly because *it's YOUR quilt* and you can do it any way you doggone well please! :-)
Anyway, there really is a method in the madness for using straight-of-grain vs bias binding instead of flipping a coin or throwing a dart. :-) .. and this is where French fold binding comes into play.
As for actually making bias tape, you can always cut individual strips of fabric, cut on the bias and sew them together to make one long strip. I have discovered over the years, that I am bias-strip challenged, in that I can NEVER figure out which way to turn the individual strips so that once they are sewn, they actually make one continuous strip. I inevitably sewn them wrong the first time and the strips come out at right angles to each other.
Then I discovered the continuous bias tape method of making bias tape. Oh my, did my life change after that! Although a bit more involved, the continuous bias tape method will automatically create yards and yards and YARDS of bias tape ... all in a nice, straight, continuous strip .. every seam neatly angled.
Then you need to figure out how wide you need to cut your strips. This will depend on how wide you want the finished binding to be. Below is a chart that will guide you on how wide to cut your strips for Double-Fold/French Fold binding, based on the desired finished width. This is your CUTTING WIDTH figure.
A PDF file of the measurement and yardage figures is here.
| Determining the CUTTING WIDTH (these widths will accommodate a medium loft batting. If your batting is thinner, reduce the CUT WIDTH by 1/8") | ||||
| Desired finished width (in inches) | Cut the strips this wide (in inches) for double-fold binding | Desired finished width (in inches) | Cut the strips this wide (in inches) for double-fold binding | |
| 1/4" | 1-3/4" | 3/4" | 3-3/4" | |
| 3/8" | 2-1/4" | 1" | 4-3/4" | |
| 1/2" | 2-3/4" | 1-1/2" | 6-3/4" | |
| 5/8" | 3-1/4" | 2" | 8-3/4" | |
| Determining how many yards of fabric needed to make the bias binding (based on 40" wide after washing to allow for shrinkage) (yardage requirements updated: 1/04. The previous amounts yielded waaaay too much bias!) | ||||||||
| Cut width of binding (in inches) from chart above | Yardage of binding fabric yields this much linear inches of bias tape | |||||||
| 3/8 yard | 1/2 yard | 5/8 yard | 3/4 yard | 7/8yard | 1 yard | 1-1/2 yards | 2 yards | |
| 1-3/4" | 305" | 407" | 509" | 610" | 712" | 814" | 1221" | 1629" |
| 2-1/4" | 229" | 305" | 381" | 458" | 534" | 610" | 916" | 1221" |
| 2-3/4" | 190" | 254" | 318" | 381" | 445" | 509" | 763" | 1018" |
| 3-1/4" | 152" | 203" | 254" | 305" | 356" | 407" | 610" | 814" |
| 3-3/4" | 133" | 178" | 222" | 267" | 311" | 356" | 534" | 712" |
| 4-3/4" | 95" | 127" | 159" | 190" | 222" | 254" | 381" | 509" |
| 6-3/4" | 76" | 101" | 127" | 152" | 178" | 203" | 305" | 407" |
| 8-3/4" | 57" | 76" | 95" | 114" | 133" | 152" | 229" | 305" |
For example, if your quilt is 45"x60", the perimeter is 45+60+45+60 = 210 inches. Add in the extra (for turning corners, etc.) of 12" for a total LENGTH of 222". Which is to say, you will need at least 222" of bias binding. If you want the finished quilt binding to be 1/4" wide, look across the 1st row (the 1-3/4" wide row) to see which amount of yardage will give you at least the 222" that you need. The first column is 3/8 yard, which yields 305". Therefore, if your binding fabric is 3/8 yard and you cut the bias strips 1-3/4" wide, you will get approximately 305" of bias tape ... more than enough for your 45"x60" quilt.
If you have a total length that isn't listed, you can combine yardage fractions to get what you need. Using the 1-3/4" wide bias strip as an example, if the total length of the quilt is 1500", 1-1/2 yards isn't enough but 2 yards is too much. You can add the 1-1/2 yard amount to the 3/8 yard amount to get a 1-7/8 yard amount (which isn't listed). This would be 1221" + 305" = 1526". (This is easily verified by noting that 2 of the ½ yard amounts is exactly equal to the 1 yard amount ... 407"+407" = 814").
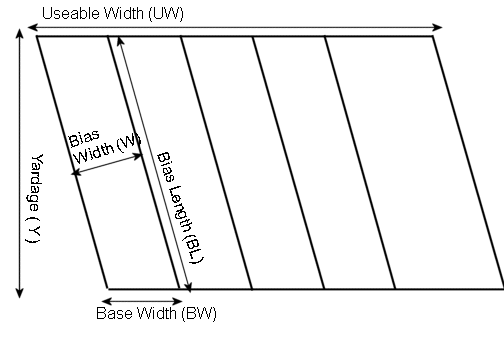
So, you're wondering how the heck did I arrive at all those figures? It's elementary, my dear Reader. Elementary geometry, that is. You can use the following formula to figure out how much bias binding you'll be able to get from any amount of fabric, whether you start with a square or rectangle. Let's take a look at a drawing.

This is the binding fabric after Step 3 (below). Although this shape is a parallelogram. the formula below will work for a square of fabric as well. You need 3 basic numbers:
1. UW is the useable width of your fabric. Remember, you can't use the entire width of your fabric. You need to cut off the selvage and unprinted fabric along the selvage edge. The useable width then is the width of fabric minus the unuseable part.
2. Y is the yardage of your binding fabric (or how long is it along the selvage edge?)
3. W is the cut width of your bias strip; not the finished width. This figure is the same as in the first table, above. You decide this amount.
Using basic geometry, the Bias Length is the square root of (2*Y2). The Base Width is the square root of (2*W2). The number of strips that can be created across the width of the fabric is UW/BW. Finally, the linear inches of bias tape that will be made is N*BL.
Let's do some real numbers. Assume your fabric is 43" wide, but you can only use 40" of it.
OH MY GOODNESS!! 305" is exactly the figure that's in the second table for a 1-3/4" cut width from 3/8 yard fabric! Isn't that neat?? (We geeks get excited over the silliest things. :-) )
Let's do an example from a fat quarter .. that's 22"x18". Let's assume that 1 inch along the selvage is garbage. Here are the figures: Y = 18. UW=21 W=1-3/4"
The BL is square root of (2 * Y2) = square root of (2 * 182) = square root of (2 * 324) = square root of 648 = 25.45.
The BW is square root (2 * W2) = square root of (2 * 1.752) = square root of (2 * 3.0625) = square root of 6.125 = 2.47.
The number is strips (N) is UW / BW = 21 / 2.47 = 8.5. Rounding to the lowest whole number ... 8 strips.
The linear inches of bias is N * BL = 8 * 25.45 = 203.6 inches or 5.6 yards of 1-3/4" wide bias strips.
Boy, that sure seems like a lot, doesn't it? Getting over 5 yards of bias tape from a mere fat quarter? Try it ... if you follow the directions accurately, you will get that much.
Sooooooo .... if you have some fabric hanging around that you want to make bias from, you can now figure out ahead of time just exactly how much you'll get from it.
Well, so much for fun and frivolity on the geek front .. let's get back to making bias tape.
For talking purposes, let's say you have 1/2 yard of fabric to make bias strips. This is 18" (more or less) by WOF (somewhere between 42"-44"). This is a rectangle. This is how you buy your yardage. Literally all of the instructions I've seen for making continuous bias strips have you start out with a square of fabric. They have you cut down your yardage from the rectangle to a square. This is nonsense to my way of thinking. Just what are you supposed to do with the fabric leftover from the cut?? I say leave the fabric as a rectangle, so you can get the most bias strips possible. But, if you have a square of scrap fabric, these instructions will still work.
Directions:
| 1. Lay out fabric in a single layer. You are going to eventually cut along the bias edge on one side, as shown here by the dotted line. | 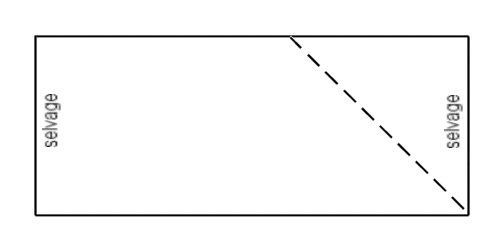 |
| 2. Fold one selvage end over to an adjacent raw edge to form a 45° angle (the bias). Cut along the bias edge. You now have a triangle that is separate from the rest of the fabric. | 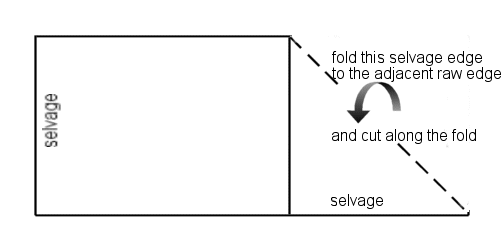 |
| 3. Sew the selvage end of this triangle to the other selvage edge on the other side of the fabric. This is a simple straight-of-grain 1/4" seam. Press open. Doing this uses the triangular pieces on the ends and eliminates waste, so you can use the entire piece of fabric. You now have a parallelogram. | 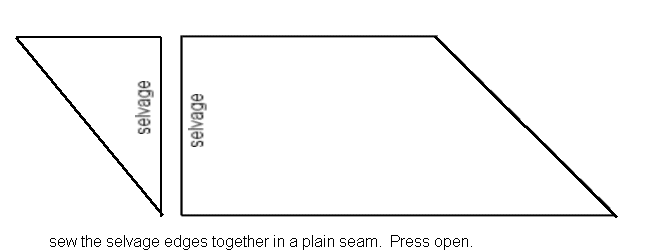 |
| 4. Using whatever marking device you want (I happen to use a regular #2 lead pencil), draw the 1/4" seam line on both of the long (raw) edges of the fabric on the wrong side of the fabric. It really doesn't matter what you use, just as long as it doesn't bleed or spread. You are eventually going to be sewing along this line, so the marks are not going to show on the right side. | 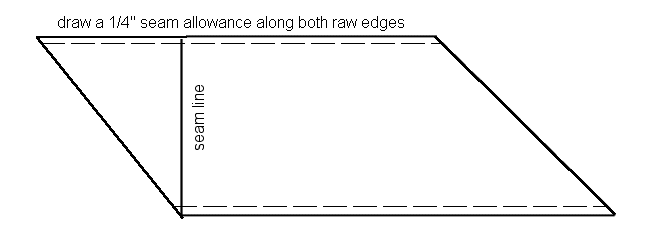 |
| 5. From one 45° edge, start drawing lines on the wrong side of the fabric, parallel to the cut 45° edge. The distance between the lines will be the raw width of your bias tape that you need, not the finished width. You need to be able to see these lines; don't worry if the marker is permanent or not .. you are going to be cutting on these lines. You should end up with a piece of fabric with parallel lines that looks like the picture below. These lines should cross the 1/4" seam allowance line, which is extremely helpful because they create the vital intersections that you need to match up. |  |
| 6. Here is the key to the whole thing: on one long edge, number the intersections from the number 1. On the other long edge, start numbering the intersections from the number zero. You can either do this mentally or when I first did it, I actually physically wrote the numbers on the fabric in the seam allowance. You are going to disregard/ignore the intersection numbered 0. The reason for ignoring the zero intersection is to create an offset .. if you don't have an offset, you will end up with nicely sewn circles and not continuous bias strips. :-) | 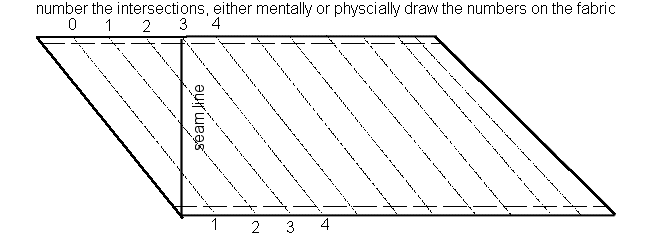 |
| 7. Stick a pin through an intersection numbered 1; stick the pin through the other intersection numbered 1. Secure the intersection with the pin. You will have a TWISTED piece of fabric. This is OK. |  |
| 8. Now, match up the other intersections of the same numbers: 2 with 2; 3 with 3, etc. all the way to the end. You will end up with a "tail" on each end of the twisted tube. (See above) This is important! |
| 9. Sew the 1/4" seam that you have just pinned. The intersections are the important landmarks to match. If the fabric between intersections isn't exactly the same, you need to stretch/scrunch it to fit. Do not move the intersections! (The reason the fabric might not be the same is because you might have drawn your lines inaccurately). |
| 10. Press this seam open. You will need to manipulate the fabric as you press the seam line because the seam line is now going to be going around in a spiral. |
| 11. Shake out your fabric so that you have a nice looking tube. You should have "tails" on each end. |
| 12. Be brave! Have courage! Now you are going to CUT along those lines you drew, starting at one tail (it doesn't matter which one). If you marked the intersections correctly and sewed the seam line correctly, you will be cutting in a spiral and end up with a lovely strip of continuous bias tape. If you messed up someplace, you will end up with worthless rings of fabric. |
Feedback, comments, etc can be sent to Shelley Rodgers at pirate@value.net. [an error occurred while processing this directive]