Cat quilt for Annika
apologies: this is only the top
Warning Will Robinson ... this page has more verbage than normal! (if you can believe *that*!)
A long, long time ago, in a galaxy far, far away .... ooops, wait .. wrong intro. :-)
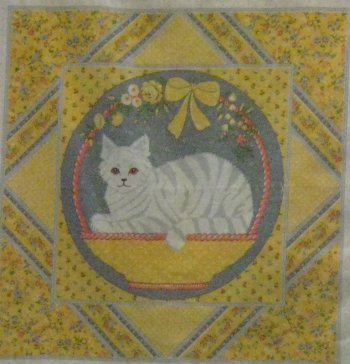
 A VERY long time ago, I purchased pre-printed cat panels. They came 2 across the width of fabric so I got two identical panels. I also bought about 1 yard of a coordinating print. And then, both pieces proceeded to age in my stash. I can't even fathom WHEN I purchased the fabric, it was that long ago.
But, there it remained in my yellow stash box. I'd flip by it everytime I looked through my yellow stash, reminding myself that 'yep, it's still there and I still don't know what to do with it." Seeing as there were *two* identical panels, I probably .. maybe? could have been? ... was thinking to make a throw pillow. Or maybe a pair of throw pillows. The only problem being that nothing in my bedroom in my parent's house, nothing in my very own apartment, nothing in the house I live in has yellow in it.
No, actually that's a lie. My kitchen is yellow and white but I don't think that I was contemplating throw pillows for the kitchen. :-)
So, there the cat panels sat. Like for-ev-er. (you gotta drag that out to have it sound right: for ..... ev ..... er. :-) )
However, I recently was going through my yellow stash again for something .. it escapes me at the moment, eventhough the project I needed the yellow/gold for is current .. such is old age and memory. :-) Now, what was I saying? (grin)
As I flipped through my yellow stash, I once again came to the cat panels. This wild hair got into my bonnet and I pulled it out. Yep, it was *exactly* as I had bought it, lo those many years ago. But NOW, for whatever reason, I decided to make something with it. Obviously, it had aged enough and Its Time Had Arrived.
Mr. Pirate has an adult niece. The niece is married to a really great guy and together they have an impishly cute little girl, Annika, who at this point is about 2 year old. I think.
Designing the Quilt
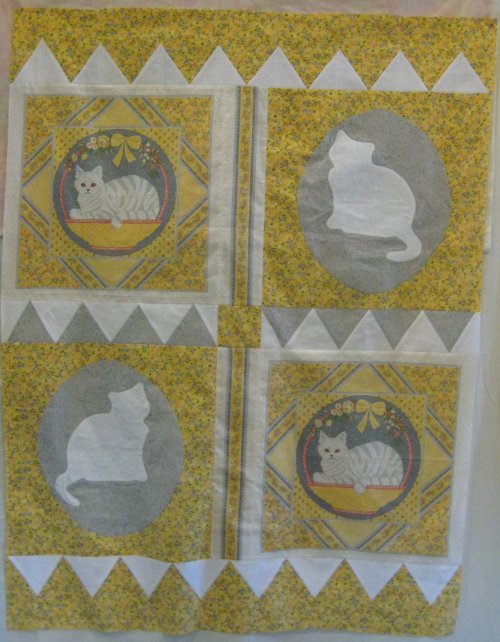
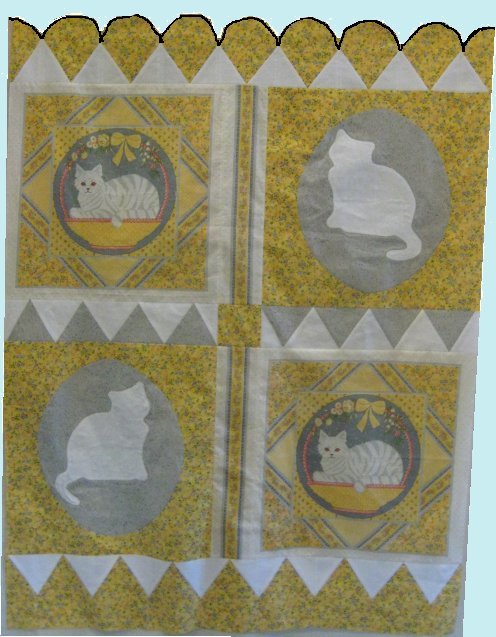
It seemed to me that the cat panels would make an impishly cute quilt for Annika ... and the design game was on. I fired up EQ (Electric Quilt) and started the design process. The basic layout was a ginormous 4-patch with some top & bottom borders to make the quilt big enough for a 2 year old.
Now that fairly begs the question .. how big DOES a quilt need to be for a 2 year old? It's been exactly 19 years since a 2 year old lived in this house and my memory is somewhat fuzzy on that detail. :-) An aside: I also make quilts for a local crisis nursery and *their* minimum size for quilts for their 1 - 5 year olds is 36"x48". Therefore, I would use that as guidelines for Annika's quilt.
The cat panels were placed diagonally in the center 4-patch. That left something ELSE needed to be placed in the other diagonal spots. After thinking for a while, I decided that a white cat applique would be a good idea. A white applique would coordinate nicely with the white cat on the pre-printed panel.
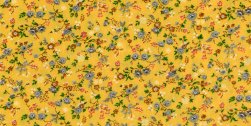
I dug out some flannel (so it would be soft to touch), found a cat silhouette and put an oval around it. I liked the idea of having a different shaped background for the applique cats from that of the cat panels, which were rectangular. I used the coordinating print yardage as the block fabric but needed a background fabric for the cat applique. Since the cat was white and the block fabric was a yellow print, the background for the oval needed to be contrasting but not overwhelming and needed to work with the colors of the cat panels. Gray fit the bill nicely. As it so happened, I *have* a marvelous tone-on-tone spattered gray print. It is such a *terrific* blender that when I found it on sale at Joann's, I bought the entire bolt. :-)
The cat appliques were made and machine stitched onto the gray oval. The gray oval was then hand appliqued onto the yellow print. Why the two different methods? Well ... to be truthful, I was home when it was time to do the cat applique and away from home when it was time to do the oval applique. Since I had put the 2 blocks into my grab-n-go handwork bag, I worked on ... and completed ... it. :-) Otherwise, using two different applique methods would have been just silly. Goodness knows that I'm not silly. :-)
Let's talk about applique:
It is only recently that I have come to enjoy doing applique. I've always loved the look, but the preparation for it is incredibly painstaking and troublesome. At least for me. There's the freezer paper template on the wrong side. That's great for needleturning the seam allowances under since the freezer paper provides a lovely crisp edge ... BUT .. you gotta get the freezer paper OUT before finishing the stitching. What a PAIN. Then there's the freezer paper (or removeable stickers) templates on top of the applique shape, using the edge of template as a guide for the needleturn. OMG .. I could never get that edge to look nice. What a PAIN. Oh, don't forget English paper piecing with newspaper .. same idea as the freezer paper on the wrong side and you *still* need to REMOVE the paper. What a PAIN.
And for heaven's sake, let us not forget all the ways we can turn the seam allowances to the wrong side and secure them. NONE of them are quick and easy, all of them just take a whole lotta time to do. And I'm just NOT. INTO. ALL. THAT. PREP.
Last year (sometime) I finished one of my Forever Proejcts, which involved tons and tons of applique. Appliques that needed to be done ahead of time so that I could plunk them down on the base fabric and arrange them in a pleasing manner. In a tangential comment, I also do machine embroidery. One supply that machine embroiderer's have in their stash is water soluble stablizer. It looks kinda/sorta like non-woven, lightweight interfacing. We use this stuff when we are embroidering free-standing lace or anything that is going to be seen from both sides. Once the embroidery is done, you soak the embroidery in warm water and the water soluble stabilizer dissolves, leaving just the embroidery. Well, for this particular Forever Project, it occured to me that if I made my appliques using the water soluble stabilizer as the base fabric, I could have them free-standing AND the edges would be turned under for the final application to the quilt. This technique worked *very* well for me, although I'm not going to go into more detail at this time. (Besides, I'll tell *that* tale when I get that Forever Project quilted and it has it's own page!)
Then, just recently, I came across a website that offered a completely novel approach to applique .. using the water soluble stabilizer idea! Julie Baird and Trudy Wasson of Generations Quilt Patterns came up with a FANTASTIC method that addresses the problems of having a crisp edge for needleturn AND not having to remove the template. Basically, you cut the finished shape of the applique from the water soluble stabilizer, adhere that to the wrong side of the applique fabric with Elmer's washable stick glue (it's the purple stuff), press it with a dry iron. Then cut the applique fabric leaving a small seam allowance, clip any curves. Smear some more Elmer's washable glue in the seam allowance area, turn the seam allowance to the wrong side and press again with a dry iron. What you then have is a somewhat stiff *FREESTANDING* applique shape with all the edges neatly turned under and secured. The water soluble template is still on the back of the shape. You can then applique the shape by either machine or hand stitching. (That, of course, is the Reader's Digest version of the process. You really need to go to their website page for all the nitty-gritty details .. they are very thorough.)
And what is the BEST part of this??? By the magic of the water soluble stabilizer template, once you launder the quilt, the water soluble template WASHES OUT. Oh, hallelujah!! :-) :-) :-)
That is the technique I used for the cat appliques.
Faux Trapunto, too!
Furthermore, I decided to do a faux trapunto effect. Traditional trapunto is fussy and involved: after the shape is stitched, on the reverse side you cut a small slit in the base fabric, behind the applique. Using a narrow, slender poker, you stuff batting into the shape through the slit. It's very time consuming. BUT faux trapunto gives you much the same look without all the fuss and bother. And these days, I'm all about easy. :-)
To do faux trapunto for applique, cut a piece of fluffy batting bigger than your applique piece. Place the batting on the wrong side of the applique *base* fabric. The order is : batting, base fabric, applique. Yes, that's right, the batting is on the *other* side of the base fabric. Fear not ... it all works out in the end. You can pin the batting in place or use spray adhesive. Then you machine stitch around the edge of your applique (or if you are machine stitching, the machine applique stitch is all that you need), securing the batting to the base fabric. Once the stitching is done, turn the fabric over and trim the excess batting away, close to the stitching line. What is left is batting ONLY in the applique shape. Now, do your quilt sandwich as normal: backing, batting, top ... only this time, your top will have that extra bit of batting in the applique areas, so when the sandwich is done, those areas will have TWO layers of batting. When the quilting is done, the applique areas will be nicely poofy. Leah Day explains how she does this process very nicely with words and pictures.
So, the cat appliques got trapunto'd. :-)
Back to designing the quilt:
The cat panel fabric also contained ribbon border stripes along the selvage edge. This meant that I had a very limited length .. exactly as long as the cat panel, in fact. I decided to use the ribbon border stripes as a vertical sashing between the two blocks. I now had (2) sets of two blocks sewn together with a vertical sashing.
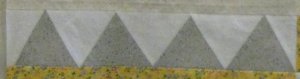 That left a horizontal sashing to be created between the top & bottom blocks. Originally, I was going to use a strip of the yellow print, but since I used that fabric as the background for the oval applique, using it again as a sashing would make it disappear. I had simultaneously been thinking of what to do to make the quilt longer and hence, more useable. I thought an ice cream cone border would look kinda cute and in thinking of that, realized that I could use equilateral triangles as the horizontal sashing! In fact, this arrangement is called a 'dogtooth' border. For whatever reason, I really like dogtooth triangles (i.e. equilateral triangles) better than sawtooth triangles (i.e. half square triangles). They just look "nicer" to me ... maybe because the appear to be balanced?
Now the deal with sashings is that they obviously need to FIT THE SPACE. How the heck was I going to figure out what size those triangles needed to be to fit the 17-1/4" space of the cat blocks???? aaaaiiieeee! Do you remember that I'm all about easy? It turned out the solution was so simple, I didn't even need to use any math at all.
I cut a piece of freezer paper 17-1/4" long (the length I needed to fit) by 3-3/4" wide. (Why that width? Because that is the width of the ribbon stripe I used for the vertical sashing.) I folded the paper in half, crosswise. And half again and again and again .. until I had a unit that was about 4" wide. That seemed to be an appropriate size. I creased the paper firmly so I could see the fold lines. Then I drew in the 1/4" seamlines on all sides. Using the approximately 4" unit, I drew in the equilateral triangles to use as a template. In this manner, I got a pieced sashing that EXACTLY fits the space and I haven't even a CLUE (nor do I care) what size it really was. :-)
To actually MAKE the pieced dogtooth sashing, I used the freezer paper strip as my template for ... freezer paper piecing! Freezer paper piecing has all the advantages of paper piecing with NONE of it's drawbacks. In fact, I have a great tutorial on the technique of freezer paper pieces on my quilting home page . The resultant pieced sashing exactly fit the space I needed. Each cat block got a dogtooth sashing beneath it and a contrasting square was put in the intersection of the sashings.
But somewhere along the way, I got mixed up because I inadvertently placed one of the sawtooth triangle sashings upside down. I didn't realize it until I hung the completed 4-patch section up on my design wall. Oh, drats! Drats! Drats. Yep, I was certainly annoyed and even considered ripping it out to correct it.
And then a funny thing happened. The project spoke to me. Honest. No, I was not smoking anything. :-)
It said to *leave* it like that. It looked kinda cool. In this orientation, the white triangles were snuggled up against the white border of the cat panels and the gray triangles were against the block with the gray oval. The more I looked at it, the more it looked like a very interesting juxtaposition. So, it remains that way.
And I like it. :-)
![]() I also need something on the top & bottom to make it a more useable length. I have always liked 'ice cream cone' borders (essentially a dogtooth strip with a scallop on top) but the one time I attempted it (in 2004 ... Aurora Pinwheels quilt) I failed miserably. :-) But for THIS quilt, I actually figured it out properly! I made myself a template of a single equilateral triangle with an extended to for the eventual scalloped top and used that to make my borders. I used a circle template to create the arc for the scallops and drew that line on the top before I quilted it. This drawn line was the *finished* edge, so I knew where my quilting needed to end.
I also need something on the top & bottom to make it a more useable length. I have always liked 'ice cream cone' borders (essentially a dogtooth strip with a scallop on top) but the one time I attempted it (in 2004 ... Aurora Pinwheels quilt) I failed miserably. :-) But for THIS quilt, I actually figured it out properly! I made myself a template of a single equilateral triangle with an extended to for the eventual scalloped top and used that to make my borders. I used a circle template to create the arc for the scallops and drew that line on the top before I quilted it. This drawn line was the *finished* edge, so I knew where my quilting needed to end.
 The secret about scallops is deceptively easy .... do NOT .. do NOT ... do NOT cut the scallops until EVERYTHING has been quilted and you are about to put on the binding! This quilt was quilted on Lizzie (my Tin Lizzie 18 longarm quilting machine) and when I loaded it, the scallops were NOT cut. The top & bottom raw edges were straight. While the quilt was still on Lizzie, I used a circle template to stitch along the drawn line.
Let's talk about the quilting.
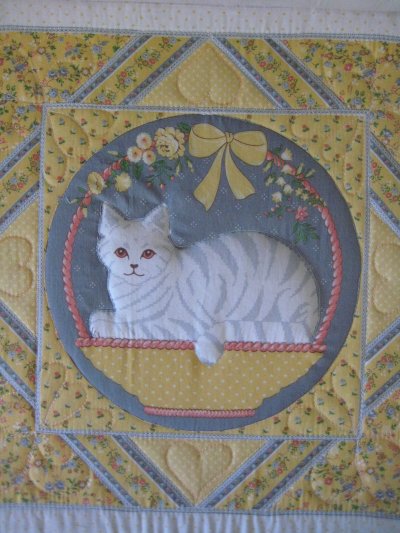

The printed cat panel was stitched in the ditch around all the major elements and hearts and a 3-lobed design were quilted in corners. The trapunto cat was stitched in the ditch around its outline; the oval background was done with a swirly sort of design, as was the block background although a different swirly design. Having an all-over quilting pattern in the background allows the trapunto'd cat applique to puff up nicely.
 The border got Sally Terry's "Hooked on Feathers" in the print triangles and a curly design to fit the white triangles. :-)
At this point, I need to profusely apologize for the lack of detail for the quilting. Truth be told, all the text for this quilt, except for the quilting, was done in 2010 when the details were still fresh in my mind. Then the quilting was done, the quilt was finished and presented to Annika & her parents ... and guess who FORGOT to take a picture of the finished quilt??? Yeah, once again, I forgot. (and although I have asked, Mr. Pirate's niece hasn't quite gotten around to taking a picture for me .. such is life.) So, 2 years after the fact and not having a picture of the entire finished quilt, is it any wonder that I just can't remember what I did? I know you understand. :-)
Finishing up.
When the quilt was finished, I unloaded it and using my home sewing machine (Janome 6500), I sewed another line 1/4" outside the existing circular line in the outer border. This would be the cutting line for the scallops. Then, it was just a matter of making the double fold bias binding, trimming the seam allowances in the scallops and sewing the binding on.
When I washed it, I was exceedingly pleased with the result.
And I really, really wish I had a good picture of the final quilt to show you. :-(