Lisa's high school graduation quilt
delayed a mere 2 years!
size: approx 88"x102"
Let us state, for the record, that Lisa graduated from high school in 2007. This is a fact. I have the photos to prove it. Let us further stipulate that I, as the over-worked, frantic Mom, realized way too late that I would not be able to finish a quilt in time for this graduation. I also knew that I would never be able to make one in secret and have it be a surprise (as happened for Lisa's older sister, Catherine, who remained utterly clueless throughout the entire creative process of *that* graduation quilt). Lisa (and her sister, Rene) have seen my sneaky ways too often to be fooled by the same sort of trick.
Therefore, I was up-front about the whole thing: let me know what quilt you want made for your high school graduation and I will make it for you. No restrictions; just make a decision. Well, when a person isn't really into a creative hobby, making design decisions can be completely overwhelming. What to choose? What not to choose? What colors to use? So, the decision floundered for a long time.
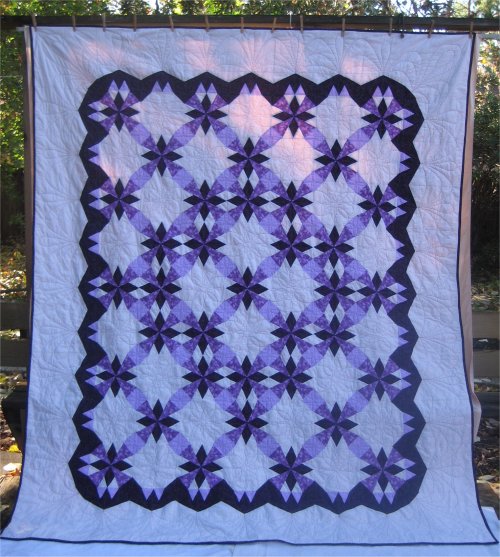
It wasn't until 2009 (yes, you read that correctly ... 2009) when I was re-perusing a quilting magazine issued in 2008, that Lisa saw the design that tickled her fancy. Oh, hallelujah! It came from the May/June 2008 issue of Quiltmaker magazine; the pattern is "Dakota Snowstorm". The magazine has it shown in shades of blue, but if you know Lisa, the only possible color to be used is purple. :-) The single alteration I made was to make the borders wider, since Lisa wanted a queen sized quilt, whereas the pattern was only a double/full.
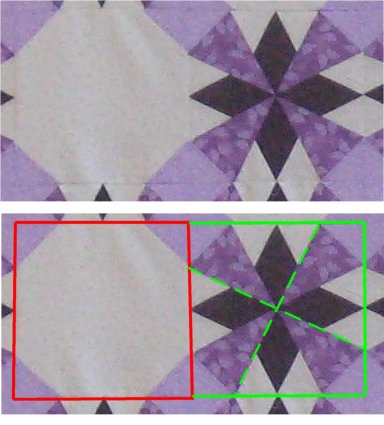 So off to the fabric store we went and after much hemming and hawing, suitable fabrics were purchased. The quilt is made from only 2 blocks: a snowball and an intricately pieced block. The magazine offered two methods of contruction for the pieced block: using templates or paper-piecing. I much prefer paper-piecing ... in fact, using freezer paper-piecing, a technique taught to me by Judy Mathieson. (I have a tutorial for this at my Freezer paper-piecing tutorial webpage.) This technique, which allows the absolute precision of paper-piecing WITHOUT the added annoyance of needing to remove the paper backing afterwards, is a favorite of mine. (In fact, a downloadable paper piecing foundation can still be found on the Quiltmaker's website.)
Once you get into the 'zen' of quilting, the blocks get completed rather quickly. It took me about one month to finish the top.
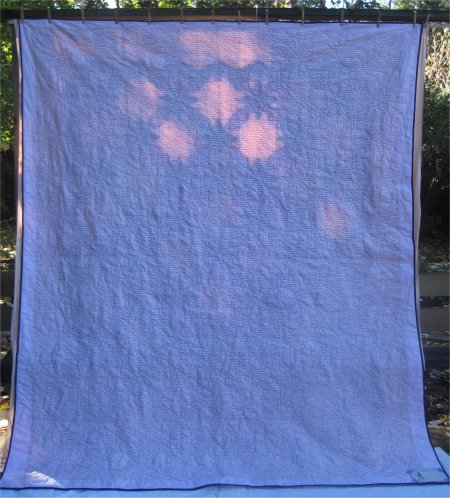
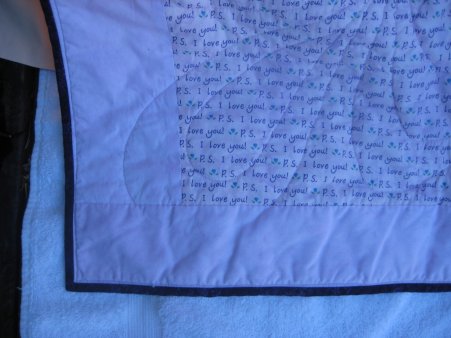
The backing fabric was something very, very special, purchased about 20 years ago, just for this purpose! (I kid you not!) It's been carefully stored in anticipation of this event. There is a method in this madness! When our girls were growing up, to make it easier for everyone to absolutely know what item belonged to which girl, I "color coded" them. Catherine was Cerulean blue, Lisa was Lavendar and Rene was Red. (That color-coding still holds true to this day; it is only very recently that Lisa has obtained a red top and Rene bought a purple top. It looks very, very odd to see them in reverse colors.)
At a quilt shop many, many, many years ago, I happened to see a fabric that came in those 3 colorways .. with an all-over print of "P.S. I love you!" emblazoned across it. How could I NOT buy it? Well, I didn't resist. :-) I figured at some point, I would use the appropriately colored fabric for a quilt backing, but not having a quilt in mind made it difficult to estimate just how much I would need. So, I simply bought a "goodly" amount, that being about 5 yards each. (I believe the fabric was designed by Jennifer Sampou, although I can't find any confirmation of this online at this time.)
 This was sufficient for Catherine's graduation quilt. But, Lisa wanted a bigger quilt. Even when I split the length into (2) 2-1/2 yard lengths and seamed those together to make a very wide piece .. it still wasn't wide enough to use for the modified pattern. However, there are creative ways to make a backing wider by either inserting fabric somewhere in the middle/interior of the backing or by adding strips to the sides. Lisa didn't like the insertion idea but OK'd the fabric strips on the sides. When finished, it would look rather like a frame .. kinda/sorta. To my great fortune, I was able to find a batik that virtually matched the background color of the backing.
As for the length of the backing ... it was going to be close. Very close. Extremely close.
When I get fabric ready to be a backing for my longarm machine, I quarter-fold the top, quarter-fold the backing and align the folded edges of each together. The backing needs to be *larger* than the top by at least 4" on the sides with the raw edges. This allows the quilter to attach the side tensioners to the quilt. Without side tensioners, the sides of the quilt flop around and you get lousy quilting. Well, the backing was JUST long enough and I figured that if I put a temporary strip of muslin at the top and bottom, I would then have enough "extra" fabric to attach the backing to the take-up roller and if I was careful enough, I would JUST come out evenly at the bottom of the quilt.
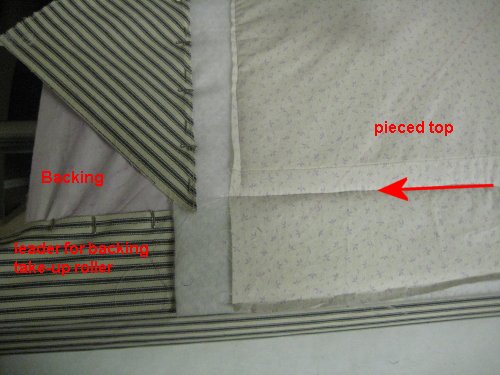 Wrong. See the picture to the left? See the line where the red arrow is? Well that line shows where the END OF THE BACKING IS. (I basted a line at that point to secure the top/batting to the backing when I discovered this horrendous problem.) You see how the top and batting extend PAST THE BACKING? As I got to the bottom border, I was horrified to realize that, indeed, the backing was SHORTER than the top. Oh. My. Goodness. Well, that was a real first for me ... and it wasn't a good one. :-(
After pondering the problem, two solutions came to mind:
1. I *could* simply make the top shorter by cutting down the top & bottom borders, but the top border had already been quilted (and rolled onto the take-up roller) and I wasn't entirely certain how much unquilted space there was between the end of the quilted motifs and the edge of the top, which meant that I might not be able to cut down the top border by the amount that the bottom border had been shorted. aarrgghhh.
OR
solution #2 ... I had those fabric framing strips on the sides. I eventually would cut off the excess width of those strips and have a long strip leftover. I already knew that I would need to turn the quilt 90� on Lizzie so as to be able to quilt the side borders in one long run. So, before I reloaded the quilt, I could sew the leftover strip fabric onto the bottom of the backing to make the backing long enough. It wouldn't look weird because this fabric was already on the sides of the quilt. Furthermore, in order to disguise this FUBAR, I could applique another section of leftover fabric to the top (which didn't actually need it) so that when you look at the back, you'll see the fabric framing all 4 sides.
 Solution #2 was chosen. The quilt was unloaded, the framing fabric was sewn to the bottom of the backing and then the quilt was reloaded onto Lizzie for the final quilting of the two remaining borders.
As to the question of the quilting motif ... since I now have a longarm quilting machine and can do all the quilting myself (woo hoo!), I no longer have the luxury of leaving the quilting design up to the longarm quilter ... cuz it's me! Although Quiltmaker did provide a very lovely quilting design, it just wasn't suitable for longarm quilting, as it was made up of 5 concentric, swirly diamonds & circles to simulate a snowflake. It really is lovely, but there was no way I was going to do *FIVE* stops for each of the 63 blocks! I wanted a design that was more sympathetic to the longarm quilter!
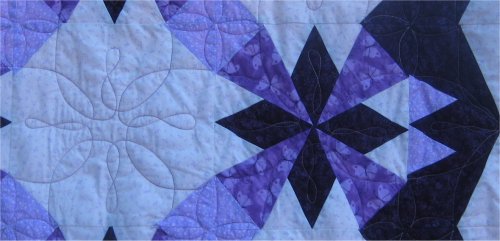 I found a stencil that had the look and feel (kinda/sorta) of a snowflake but could be completed in one pass per block. After studying the design lines for a bit and practicing on a white board, I also figured out where to start so as to be able to do two blocks with one pass before I needed to stop and tie off. The same quilting design was used in the pieced block, as well as in the Snowball block. However, for the life of me, I can't remember where I got the stencil from. :-( I used Superior Thread's King Tut in a variegated purple for the quilting and Superior's Bottom Line in the bobbin. The variegated purple showed up dark in the light areas and lighter against the dark purple fabric; I was well pleased with the choice.
Since I practiced the quilting design on a white board, I had the "muscle memory" to free-motion the path required for quilting. I didn't need to actually mark it with the stencil.
 The borders needed something different. They had a bigger area to quilt than the blocks so I couldn't use the same design in the borders as in the blocks. I'm also having a love affair with swags. :-) The problem with swags is that (it seems to me) they need to be sized exactly to the specific area. Which means that every single quilt could require a different swag template. Now, you can buy swag templates, but if YOUR quilt doesn't fit THEIR measurement for the swag, what good does it do you?
For a previous quilt, I had made my own (temporary) swag templates from lots of layers of cardboard. It worked rather nicely but cutting out all the layers needed to make a template suitably tall enough to use with a longarm was tedious. It just so happened that I had some 1/4" foam board sitting around. I figured that 2 layers of that would work wonderfully .. and it did! I traced off onto paper the swag designs I needed, then cut those swag curves from the foam board. The two layers were securely taped together. I have to say, this ad hoc method of making curved templates, while a bit time-consuming, works very well .. and you can't beat the price! Lizzie followed the edge of the foam templates very well, although there were some wobbles when I had to reposition my hand so I need to figure out a better way for me to do that.
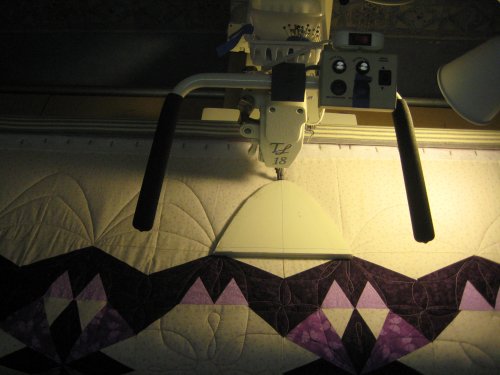 Here's a photo of the homemade template in position to be used. I do apologize for the darkness of the picture; I was quilting at night and this is the best lighting I could arrange.
There was still some "bigger" areas between the swags that needed quilting (otherwise they would be puffy) and I needed to think of what to put there. I eventually decided to quilt some teardrop shapes, which would tie in with the loops in the blocks .. but as I didn't have a template for the teardrop, I decided to freehand the shape with chalk and then just trace of the line. Well .. that was less than splendiferous, as there were quite a few wobbly lines. ::sigh:: In hindsight, I just should have waited for the next day to get some more foamboard to make another template and done it that way. But I didn't. It's done now and will remain that way.
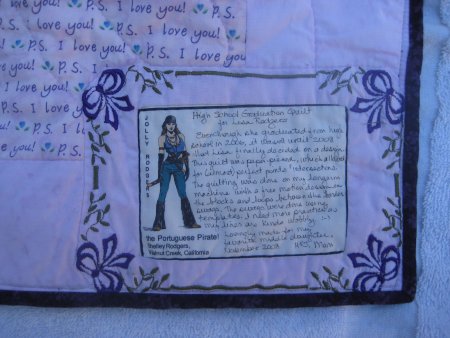 I did something new for the label for this quilt: normally, I simply print my pirate alter-ego label and catch it in the binding stitching. This time, I decided to use a machine embroidery design to create an embroidered frame to go around my pirate label. The embroidered frame for the label was available for free from "Quilts 4 U", but by 2012, they seemed to have disappeared. This specific design is "Bow Vine Frame" Originally sized at 5-7/8" x 9-1/3", which is too large for my 5x7 hoop, I used Embird, to remove some of the vertical & horizontal bar stitches to shrink the design to fit my hoop. I don't have any particular embroidery thread loyalty: I use whatever my machine likes in the colors that I need. :-)
Astounding addendum: I actually messsed up on the verbage of the label! I put down the wrong years for not only when she graduated (I put down 2006, should have been 2007) but ALSO when I finished the quilt (sheesh, I put down 2008 instead of 2009!) Ya know, one of the things I miss most these days is my mind. :-)