The Cat & the Canary
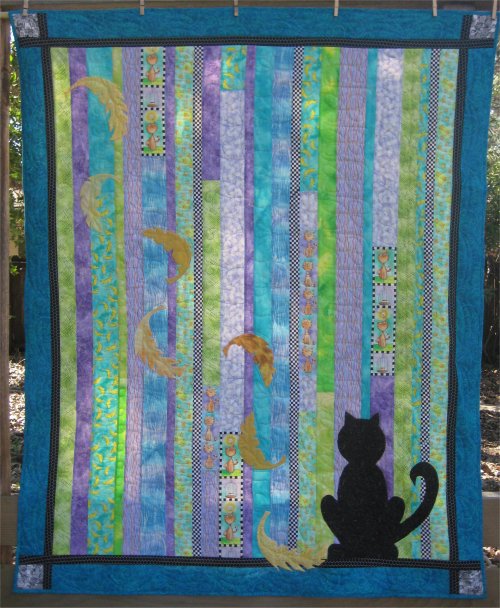
size: 53" x 66"
Note: I have been advised that I am TOO WORDY. I need MORE PICTURES and less links. Harumph. Therefore, I will try to put more pictures alongside of the text so your poor eyeballs don't glaze over too soon. However, with this particular story, the pictures don't come until fairly late in the chronology ... don't fade out on me too soon! :-)
In 2000, an interesting book on techniques for quilting with a home sewing machine (as opposed to a longarm quilting machine) was published. This book is "Divide & Conquer!", by Nancy Smith and Lynda Milligan (ISBN: 1-880972-4-3). The emphasis of this book is how to split the batting into manageable sections, quilt those sections then seam the quilted sections together. However, this is not why I bought the book several years later.
While the attractiveness of any specific pattern may catch my eye and prod me to buy it, I don't usually make my own quilts verbatim, mainly because I have my own stash to work with. One of the quilts in the book is called "Cat Nap" and featured a delightfully whimsical cat fabric designed by fabric designer Patrick Lose. It is a strip quilt with some appliqued feathers & cat designs ... a very simple top to put together .. but it was those specific Patrick Lose fabrics that caught my eye. I LOVED the colors. I LOVED the arrangement. And while, at that time I didn't do applique, the appliqued designs were just really too, too cute. :-) I also distinctly remembered SEEING those cat fabrics recently in one of my local quilt stores. There are also other quilt layouts in the book that are very, very attractive and they are on my List of Quilts to Make.
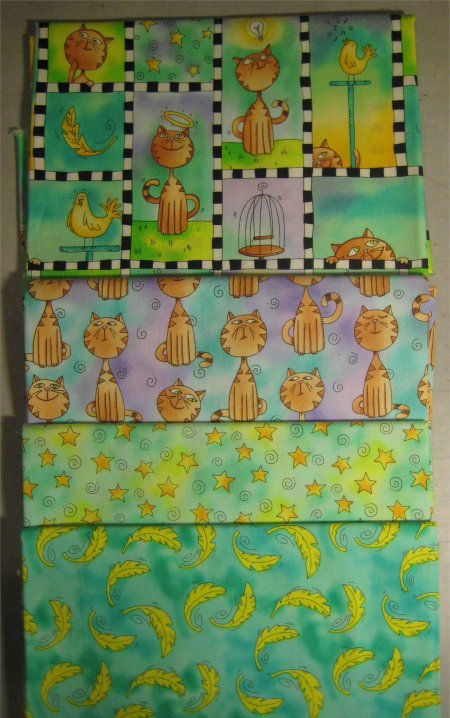 Without further ado, I rushed right out and bought the focus cat fabrics. I wasn't too concerned about the blender and companion prints, as those could be anything in the color families used. It was the FOCUS FABRIC that really made this quilt and I didn't want to miss out by waiting too long.
And then, having purchased the main fabric for the quilt, I let it age. I firmly believe in the phrase, "I will make no quilt before its time" (or until I remember it again). (As it turned out, I'm not sure what I was thinking when I bought all the fabric I did ... I sure wasn't following the suggestions in the book for the quilt. The quilt really is a generous sized throw quilt; it's not quite big enough for a real twin size bed quilt. However, after finishing the top, I discovered that I have HUGE AMOUNTS of all the fabrics left over! Obviously, I had something other than a throw sized quilt in mind when I bought the fabric but due to my Swiss Cheese Memory Syndrome (tm) (where everything I need to remember has slipped through the holes), it didn't occur to me that I might have made Alternate Plans, which required more fabric. As a result, I have more than enough of everything to make another quilt.) (for another time) (when I remember)
Let us now flash-forward to January 2009 and digress to another topic. For the past several years, 8 wonderful ladies of About.com's Quilting forum who all live, more or less, in the general Phoenix area, get together, plan, plot and organize a wonderful Quilting Retreat in Phoenix. Announcements are made on the forum in the Winter, the requests to attend start flooding in for the Retreat, which is usually sometime in February. In the more recent Retreats, there have been guest speakers and the guest speaker for 2009 was none other than ... Patrick Lose! Turns out that he lives in the area! Who knew?
Because I have a phenomenal memory ::cough:: ::cough:: (where did I put that seam ripper?) I remembered the "Cat Nap" quilt from the "Divide & Conquer!" book. I thought it would be a really nifty idea to have as one of my Show-n-Tell items, the "Cat Nap" quilt with Patrick's own fabrics ... and have it hanging on the wall when he showed up for his talk & trunk show.
As the layout is a simple strip quilt, I think it took longer for me to cut the strips than to actually sew them together. The hardest part was deciding which fabrics to put where. The large feathers and cat silhouette were appliqued on and the top was ready for the Retreat.
At the Retreat, I did my Show-n-Tell and then tacked the top to the wall behind my table spot. I was told, later on, that Patrick saw it first thing when he entered the room and walked up to look at it. Drats ... I wasn't in the room at the time. AAAARRRGGGHHHH.
Patrick Lose is a fantastic speaker ... he simply told of his background, how he came to do what he does and the process from design conception to fabric production ... and some very amusing anecdotes. :-) Others have blogged about his trunk show and I direct you to read about it at Sophie Junction and even Patrick himself blogged about being with us!
Upon returning home after the Retreat, it was time to load the top onto my Tin Lizzie. I devised a quilting plan for it: since it is all columns/strips of fabric and I need practice (much more practice!) with different quilting designs, I decided that I would make this quilt a sampler of sorts .... different quilting motifs in the columns. Some of the designs use one column; some of the designs use up to 3 columns in width.
 To preview the designs, I printed out a picture of the top and drew which quilting designs I wanted where, so I'd have a Master Plan to refer to. :-) I bought some King Tut thread in some really luscious colors to compliment the fabric.
But first ... a backing. I needed to piece it together, as the quilt top is about 53" x 66". I was thinking of getting some bright fabric to go with the top but subsequently decided that I probably ought to go the cheap frugal route of using plain muslin. Joann's had muslin on sale for $1.49/yard and I needed about 4-1/4 yards (2 strips of 2-1/8 yards seamed together lengthwise to give me the width I needed).
While using a complimentary colored fabric on the back would certainly LOOK better, it would also cost a lot more. Despite what Mr. Pirate thinks, I actually DO think about how much things cost before making a purchase. :-) So, I bought the muslin, washed it, dried it, ironed the selvages flat, split it into two pieces, seamed those together and FINALLY loaded the backing onto Lizzie. (post script: the quilt has been quilted. the label sewed on. I'm admiring the wonderful quilt when my eye strayed to a translucent plastic bag containing fabric on a nearby chest of drawers. It hit me: that bag contained the BACKING for this quilt. Oh. My. Goodness. I had already purchased a wonderfully velvety flannel to compliment the colors in the top ... and there it sits. Geez, Louise ... talk about being a doofus. Well .. it'll make a nice quilt (someday) (when I remember it)).
I dug out a roll of Hobbs Heirloom Premium cotton batting (although the package says that it's actually 80% cotton/20% polyester). I was about to load the batting onto Lizzie when I read on the packaging that the batting would shrink about 5%. Well .. hmmmm. I'm not a huge fan of the old-timey, wrinkly look from the git-go. If a quilt eventually turns out that way, that's cool .. but I kinda like my new quilts to LOOK new .. at least once. :-)
The package gave directions on how to pre-shrink the batting, so I did. This meant another day's delay, as I waited for the batting to absorb all that water, spin the water out, fluff dry the batting. THEN it was loaded onto Lizzie.
Finally, I was able to load the top! Because the top is made up of vertical strips of fabric, the easiest way to quilt this would be to "railroad" the quilt .. i.e. load it so the length of the quilt is pinned to the leaders. This makes all the seams parallel to the rollers and allows the top to be smoothed nicely on them. It would also allow me to easily quilt my motifs along one entire column as one pass.
Unfortunately, the very first strip to quilt is the border ... and I had decided I wanted to attack swags again. (Mr. Pirate believes 'swag' stands for Sewing Wild Ass Guess, eventhough a lot of planning went into the top and the quilting plan. :-) ) Nice swags are difficult to do free motion (or at least for me they are); a template is the best way (for me) to quilt them. There are commercially available swag templates .. and I have considered buying them .. but they come in distinct sizes. And what are the chances of your already-sewn top will be an even multiple of those sizes? yeah .. about the same as winning the Lottery.
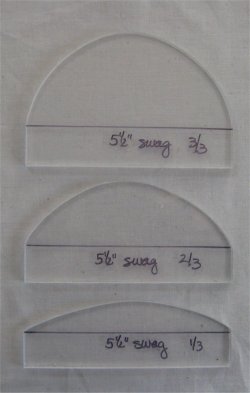
So, I went to my TAP Plastics store (where they fabricate things & cut acrylic plastic) with my paper patterns in hand, sized to THIS quilt. The sides needed a 7" wide swag & the top/bottom needed a 5-1/2" wide swag. The actual acrylic plastic needed for the templates was pretty doggone cheap; it was the labor that was the killer! But actually, it wasn't terribly much for 6 separate templates. (post script: it turned out that the final cost of each set of my templates is more or less the cost of buying them commercially for the same size swag. Interesting. And no postage!) It would, however, take a couple of days for the templates to be cut out.
However, this meant that I couldn't do the borders the first thing .. but proceeded onto the body of the top. And in fact, I finished the entire center part of the quilt ... all the different quilting designs AND outline quilting (not perfectly, but I'm getting better!) in one (mostly all day) quilting session.
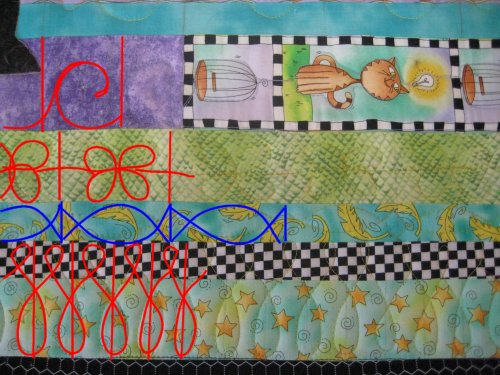
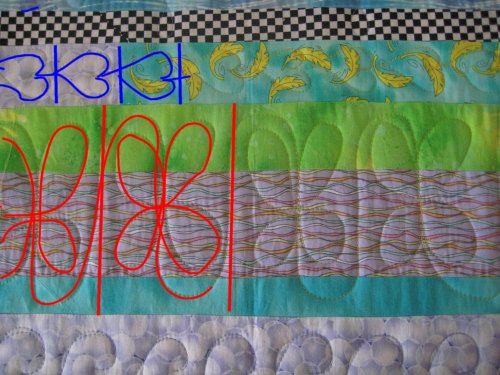
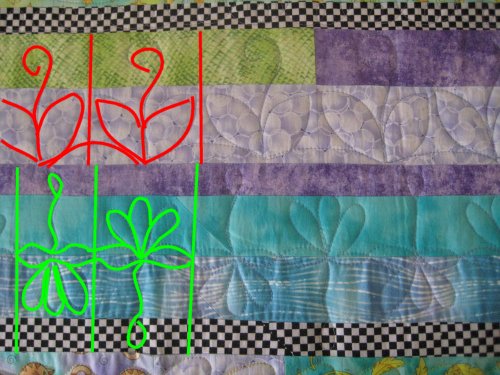
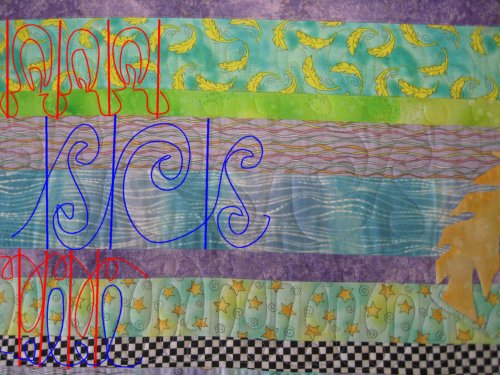
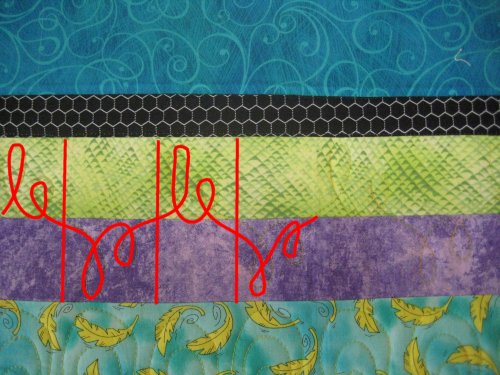
As I perused a nifty quilting motif book I recently purchased (from the Quiltmaker collection, "Quilting Motifs, volume 7", ISBN-13=978-0-9816947-6-7), I noted which design I wanted to use on which row(s). Unless you are doing a completely random design, being consistent and regular in your design spacing is important. I can't eyeball this consistency on a large scale, so marking the quilt with segment lines was necessary so that I would know where each motif was supposed to go. It's much easier to do a nice, consistent loop if the space is smaller than if you have a long, continuous row. I used Clover's Chaco Liner (reminder to self: buy more white refills!) to mark vertical lines in each row, dependent on how wide each individual motif needed to be.
Here are the rows I did with the segment lines & quilting design drawn in on the left and the actual quilting on the right of each picture. The vertical lines in the pictures are NOT quilted .. they are the segment lines used for spacing purposes.
 |
 |
 |
 |
 | |
Finally, the TAP Plastics store calls to say that the swag templates are ready! Woo Hoo! The swap templates are 1/4" clear acrylic plastic onto which I drew a base line. The templates (on the left) yield the swag quilting on the right. Dang ... they look pretty doggone good!
 |
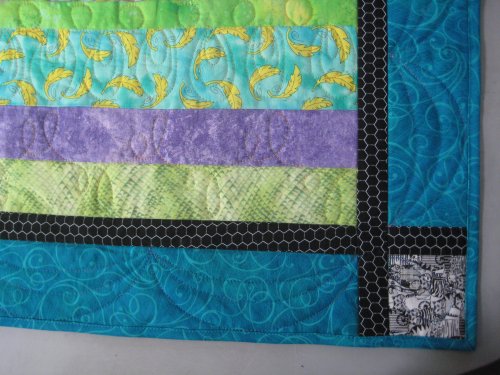 |
Here's an item that I didn't think about before hand .. and you should learn from my oversight! See the black & white chicken wire in the borders (above)? I cut the fabric for these borders crosswise cuz it is a more economical use of the fabric. Well, I know that crosswise prints are notoriously off-grain but I didn't take that into consideration. I should have either cut the fabric lengthwise OR simply cut them crosswise albeit off-grain. Either way would have given me a chicken wire print that doesn't make my eyes go awry. :-)
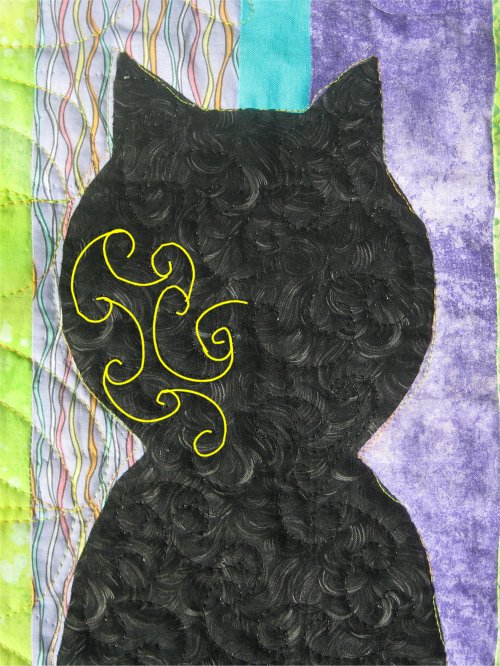 Once all the rows and borders were quilted, I stepped back to admire my work. It was then I realized that the cat silhoutte was kinda on the large size .. it really needed to be quilted as well. The fabric I used for the cat was a swirly, feathery sort of design (in keeping with the Cat and the Canary theme) and I did a kinda/sorta swirly design for the quilting. Look carefully at the picture cuz, boy, is it difficult to photograph black on black!
One last item ... when I was measuring the top for the swag templates, I didn't merely get the width and divide; who knows what sort of number that would be? And really, who cares what the measurement of the swag is, as long as it fits the space? So, what I did was to fold the quilt in half .. and in half .. and in half .. ad naseum .. until it was a "reasonable" size. I marked the fold lines with pins and made paper templates to fit between the pins. It was with these paper templates that the TAP Plastics guys used to cut the plastic.
When the top was loaded onto Lizzie and I was ready to quilt the swags, I wanted to make SURE that templates would still fit properly. They should, cuz I used the quilt itself for measuring. So, I placed a template onto the border and marked the edge with a pin .... and marched right down to the end of the border. Imagine my atonishment when there was NOT a whole space available at the end for a swag. It was *almost* a whole swag. Oh dear.
The only thing that I can think of to account for this is that when the top is loaded onto a frame, it is stretched taut. When I measured the quilt initially, it was simply laying flat on my table. Obviously there is a difference. I still used the templates at the end of the border but to accommodate this difference, I just kinda/sorta "slid" the template horizontally to make it fit the shorter space. Yes, if you look for it, you'll see that at the corners, that final swag isn't quite the same shape and size as the others in the row, but it's GOOD ENOUGH.