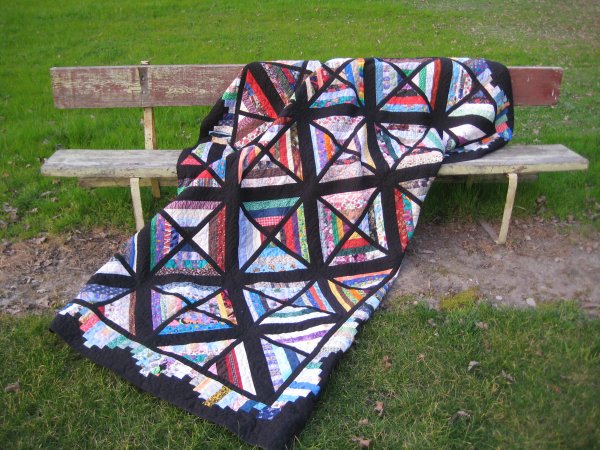
God's Eye
or an attempt at scrap basket management
pieced: January 2008
quilted: March 2013
It was supposed to be a throw-sized quilt .....
I've been collecting scraps for a very long time. As all you quilters know, everytime you make a quilt, you generate scraps. A lot of the scraps are "decent" sized and it would be criminal to throw them away. So, I toss them into my scrap basket.
When the scrap basket becomes sufficiently overflowing, I sort through it. Because I do a lot of strip-piecing, most of my scraps are saved with an eye towards becoming strips. Sometimes I'll save a generous sized scrap instead of cutting it down. Sometimes I just like the fabric as is or the piece is such a "nice size" that I could do "something else" with it .. sometime. :-) But most of my scraps get made into strips.
And so I have shoe-box sized boxes of strips, 1-1/2" and 2". Why I decided on those two measurements, I'm not quite sure at this point, but I sure had a LOT of both sizes and I'm sure I had a Very Good Reason for those measurements.
At the time this quilt was made, I had TWO scrap baskets, overflowing to about twice their height. I decided one night to sort through them, iron the pieces, decide which would be retained intact and which would be cut down. Another night was spent actually doing the reduction cutting. I made a LOT of strips.
And then, whilst I was looking for something else, I found another stash of 2" strips. I think they multiply like dust bunnies.
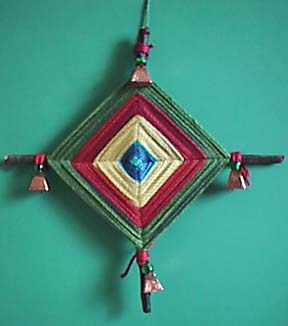 I've had in my mind, for some time, to make a God's Eye scrap quilt and all those 2" strips would be perfect. The reason it's called a God's Eye quilt is the apparent similarity with the wrapped yarn around two perpendicular sticks craft item.
This block starts out with a strip laid on the diagonal and more strips sewn diagonally to each corner, using a sew-n-flip technique. To ensure that my blocks would come out the same size, I used a fabric foundation. When I started, I used only the 2" strips. Then I thought it would be more interesting to mix in some 1-1/2" strips also. As I sorted through my scraps, I discovered some "odd" width strips and used them as-is. Unfortunately, I didn't think of using these other width strips until fairly late in the game, so most of the God's Eye blocks are made strictly with the 2" strips. Good thing this isn't an heirloom or show-quality quilt. :-)
I also save all sorts of muslin scraps, some very large, since I also sew garments and make mock-ups of some of the garments out of muslin fabric. I sorted through my muslin scrap stash and pulled all the large pieces to cut them into foundation squares. For no reason whatsoever, I cut all my fabric foundation squares at 10-1/2" so they would finish at a 10" square. Maybe it was the biggest square I could cut from a piece of scrap muslin .. [shrug] .. who knows. It really doesn't matter for this quilt.
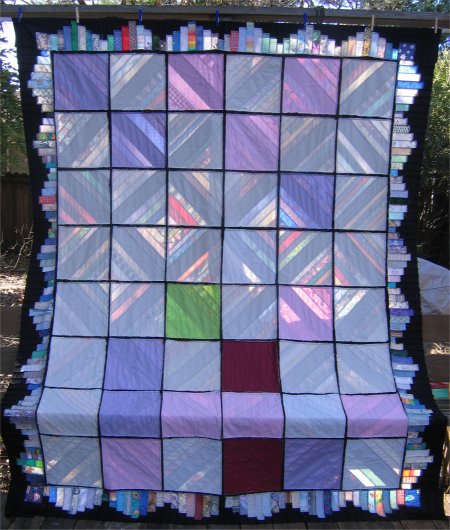 So, I cut a bunch of muslin foundation squares and began to sew the God's Eye block. Eventually I discovered that I was going to run out of muslin squares. I rummaged through my fabric stash and dug out the solid poly-cotton fabric that were left-overs from my garment-sewing days. I was pleased to find that fabric and put it to good use. Since the fabric foundation will not be seen, it really doesn't matter what color it is ... you just need to be sure that the foundation fabric color doesn't bleed through the fashion fabric on top. You can see from the picture of the back that I've used a number of colored foundation squares.
Here's True Confession time: I can't do random. It's just in my nature to micro-manage and coordinate and match and second-guess what should go next. I've tried to do the "brown bag method" of dumping all the strips into a brown paper bag and simply using whatever strip I pulled out next .. but when the "next" strip was too matchy to the previously sewn strip, I'd pull out another strip. I could never win.
So, with each God's Eye block, it was a struggle to NOT develop a pattern. It would have been so easy to organize the strips into rainbow order and then select a strip from each pile. But that would have resulted in a PATTERN, which I wanted to avoid. I eventually just jumbled all the strips together then neatly restacked them for easy picking. Kinda like the brown bag method but a little more controlled.
This block is SO EASY to make. Even with minor interruptions, it took me a little less than 10 minutes per block to sew, trim and square up. The squaring up is done by turning the sewn block so the foundation fabric is facing you and using the edge of the foundation fabric to trim all the strips to size. The fabric foundation ensures that the resultant block is stable (since the foundation fabric is on-grain, you can safely use bias strips and not worry about distortion) and all the blocks will be a uniform size.
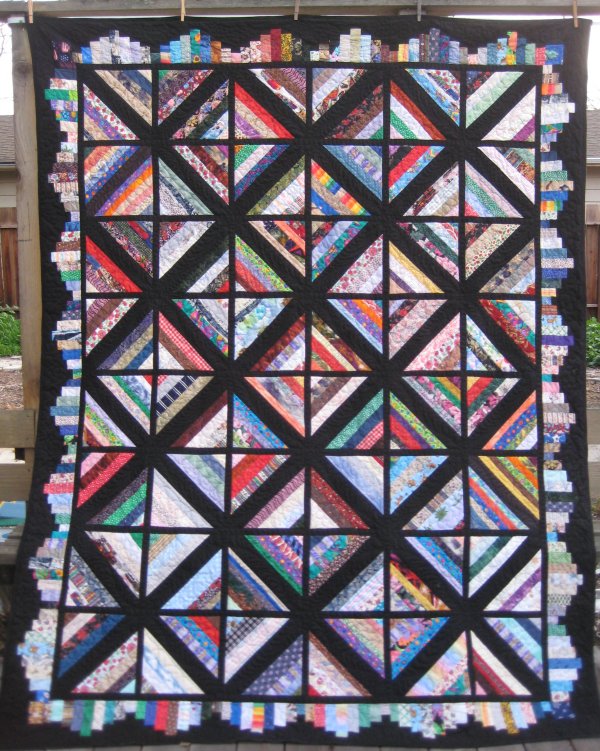
I used Electric Quilt to "design" the quilt beforehand so I could play around with the layout. Since I was using a solid black strip as the diagonal, I knew there would be a strong diamond effect. Just to produce something a little different than all the other God's Eye quilts, I decided to also have black sashing between the blocks. Electric Quilt is a wonderful tool to let you see what the effect is like before you ever cut into your fabric.
My original intent to was to make a lap or throw sized quilt ... something that was less than 44" in width, so I could use a single width of fabric for the backing. By the time I made the original 24 squares, I realized that I had a LOT of strips remaining. And since making a block didn't take that much time, why not just make some more? :-) Eventually, at 80"x100", the size I ended up with is either an extra long double OR a slightly too-narrow queen. :-)
Sewing on the sashing was incredibly boring. Mind-numbingly boring. It's just looooooooong strips of fabric. B-O-R-I-N-G.
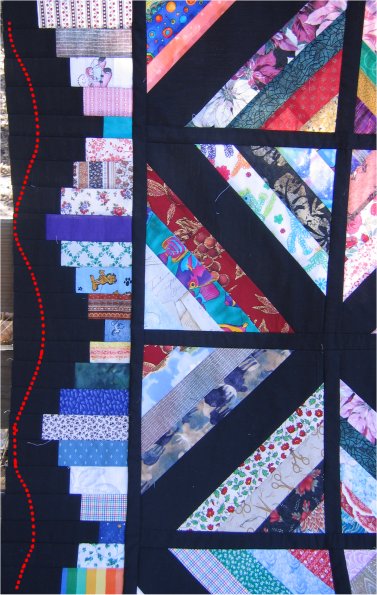 And then, because I still had more strips, I decided to put a scrappy border on the quilt. One of my all-time favorite books for unconventional and unusual borders is "Foundation Borders" by Jane Hall & Dixie Haywood (ISBN 1-57432-801-8). I've used this book for several borders and the one I chose for the God's Eye quilt is a bargello-style border. In the book, the quilter used a hand-dyed, ombre-shaded fabric that naturally changed colors as different areas of the fabric was used. I substituted my scraps, which made the construction of this border a little more difficult. The book's method is to use several strip sets, then sub-cut the strip sets into the necessary stairstep segments. I couldn't make strips sets with my scraps, as I wanted every segment to be different.
Soooooooo ... I painstakingly cut each bargello piece individually from my 2" strips. Ugh.
The border is cleverly made from blocks, each block has a certain number of segments. The border block is sized to the quilt block size. The border in the book had 6 segments, so I decided to try that. My quilt blocks were 10" finished with a 1 inch sashing. That results in an 11" block, not including the sashing on the top & bottom of the quilt. An 11" block is awkward to work with .. the dang number is a prime!
While the 2" strips were useable, unfortunately, they weren't exactly the right size for the border block to fit the quilt block. The actual size I need to use was some really weird fraction, that absolutely no one would be able to cut accurately, sew accurately and iron accurately! But I tried ... and what a failure that attempt was!
BUT, with Electric Quilt, it's very easy to make a block any size you need. So, I told Electric Quilt that I wanted an 11" block with 6 segments .. unfortunately, my 2" strips wouldn't work with that restriction, they weren't wide enough. I was NOT about to cut more, wider scraps just to use a 6-segment border block! I discovered that in order to use my 2" strips, I needed an 8-segment block. Again, Electric Quilt made the transition very easy. I now had a pattern for a border block using my 2" strips.
After making 2 ::ahem:: "practice" border blocks and failing miserably to produce an 11" block, I decided that I would do freezer-paper piecing ... then it wouldn't matter because the paper piecing pattern would force the size to be correct. I love using the freezer-paper piecing technique .. since you don't sew through the freezer paper, you never have to tear the paper off ... it just peels off like a sticky note .. and you can re-use the template many, many, many times. [Aside: I have an incredibly wonderful tutorial for freezer paper piecing on my quilting home page. ] [end blatant self-advertisement]
Once I used the freezer-paper template, the border blocks came out perfectly. I was very, very pleased with the result.
But, I just couldn't let well enough alone. The border blocks, as sewn, have a straight edge. The bargello strips give the illusion of a wavy, curved border. So, I have tentatively decided that when this top is actually made into a quilt (at some future, undecided date), I will follow the curve of the bargello border so that the quilt will have a scalloped edge. [Note to self: remember this!]
February 2012: quilting begins.
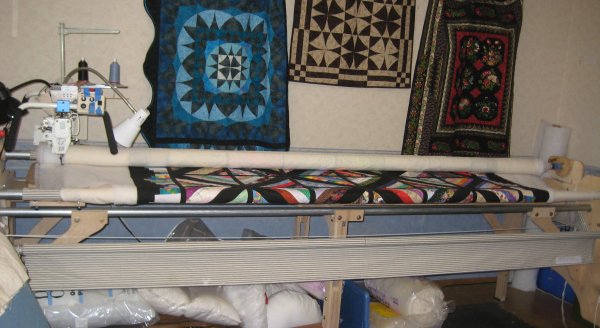 The black fabric I used is really wierd. It's kind of a brushed cotton, but it's not "quilting" cotton. I bought it online .. eBay, I think, so it was sight unseen. Foolish, huh? ... and it turned out to be a heavier than normal fabric. It's kinda weird stuff. But because it is heavy, I used a Mountain Mist's light-loft polyester batting. It worked out well .. it drapes nicely without adding more heft.
The thread is a new-to-me brand. It's "Premium Select" by NanoFiber and is their Soft Antique line. It's a 40wt polyester but is finished to have a matte cotton look. So far, it's working nicely with my Lizzie. I'm eager to see how it holds up to regular laundry and wear.
I've used black thread on the black fabrics and a medium blue thread in the strippy triangles. I really do like the matte finish; it's more subdued look than the typical shiney polyester.
I got this thread through Shoppers Rule. Allegedly, they bought a liquidation shipment when a distributor's financing fell through. In order to move the thread, they are offering a "best 50 colors" for an extremely reasonable price. Each cone is 3000m/3280 yds. At their special deal pricing, each cone came to about $1.87/cone *shipping included*. (It was $1.24/cone prior to adding the shipping in). I figured at that price, if Lizzie didn't like it, I could unload the cones. But, so far, so good. (If you didn't want to spring for their "best 50" deal, each cone is currently selling for $1.89.)
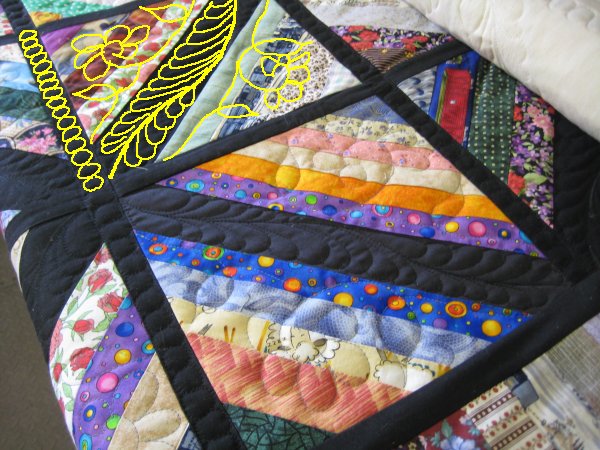 I've quilted String of Pearls in the narrow black sashing between the blocks.
There are different ways to stitch String of Pearls:
For *this* quilt, I opted to do the circle-and-a-half because there were just So Many circles that needed to be stitched in all the sashing and I was getting a better result than with the Figure-8's.
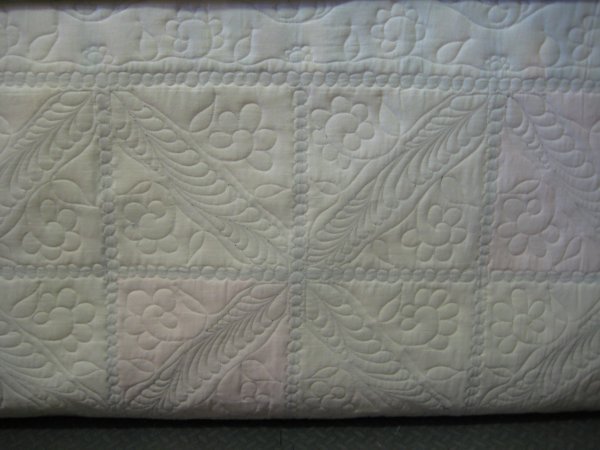
I used one of Carla Barrett's sashing feathers in the center diagonal. She has a downloadable PDF for the tutorial at that link. This is just a *beautiful* feather to stitch. It's so very, very graceful. I did chalk in the spine first so that I would be sure that the feather would fill up the length of the diagonal properly but after than, all the feathers were free-motioned.
 In the strippy triangles, I've quilted free-form leaves and daisies. I'm not entirely enthusiastic about that choice, but I just couldn't come up with *anything*. I need a quilt design guru. :-)
There are 48 blocks in this quilt, each one being comprised of 2 strippy half-square triangles and a center diagonal. The free-form leaves and daisies could not be stitched continuously, which meant that EACH triangle was its own individual design. And each one had it's own start and stop. How many? Well ... 48 blocks, each block has 2 triangles .. that's 96 triangles. 96 starts & stops. Oy vey.
As I was quilting one of the triangles, it occurred to me that it wouldn't have mattered WHAT design I did in the triangles, they ALL would need to start & stop in each area independently. Because I am using blue thread, there's no way I could sneak through to the adjacent triangle .. the blue thread would show up on the black sashing fabric. ::sigh::
I have a nifty timer that clips to Lizzie. I use it to track the time I spend quilting. The time it tells me is mostly accurate; sometimes I'll forget to stop it when I'm not quilting .. sometimes I'll stop it running when I think I've finished ... so overall, it's probably more-or-less accurate. For this quilt, it's been 9 hours of quilting spread out over 3-1/2 days ... from Friday through Monday morning. But, I tell ya, it has certainly FELT as though I've been quilting forever! :-)
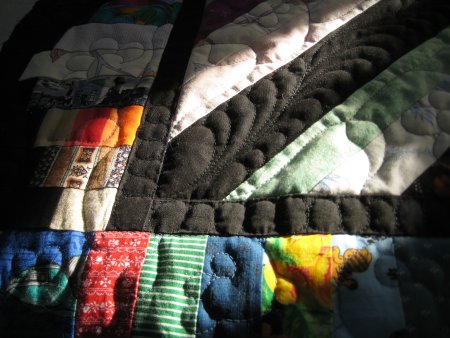
 You can't see the quilting very well from the front, simply because the pattern is so busy with all those different fabrics and the black quilting on the black fabric just disappears. But from the back .. wowsers! It really looks like I did a good job! ;-)
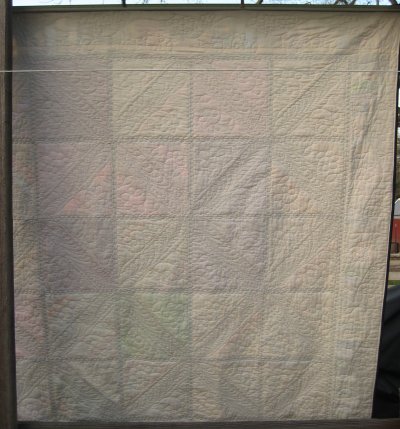 heh .. remember that I said I used various colored light-weight fabrics for the foundations? And I didn't much care what the color was because it wasn't going to show through to the front?
Well, that's all still correct .. but .. heh .. take a look at the view from the backing. Even the pastel fabrics used as foundations show through the batting and the muslin backing. :-)
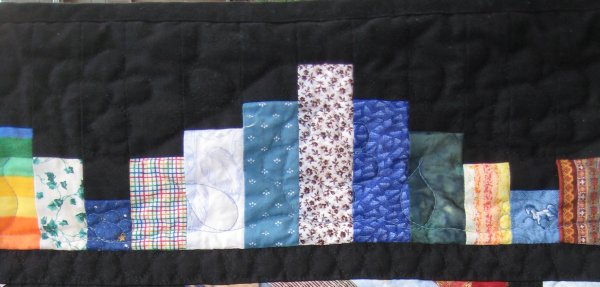 As for the borders ... I opted to stitch the same freeform leaves & daisies in the black and the bargello part of the borders. Once again, I couldn't think of something original and attractive but figured that repeating the same motif in the borders as in the strippy triangles would tie them together.
And, to be honest, I was just too lazy to figure out a design that would look good with a scalloped edge! I still love the look of scalloped edges but with all the tops I still need to finish, it's better than this quilt got DONE than wait for me to feel like doing a scalloped edge. :-)
It is really, *really*, REALLY difficult to photograph black thread on black fabric; the black just soaks up all the light, so I do apolgize for the less-than-informative picture. It was honestly the best I could do with my limited photography skills.