Peace
August 2007
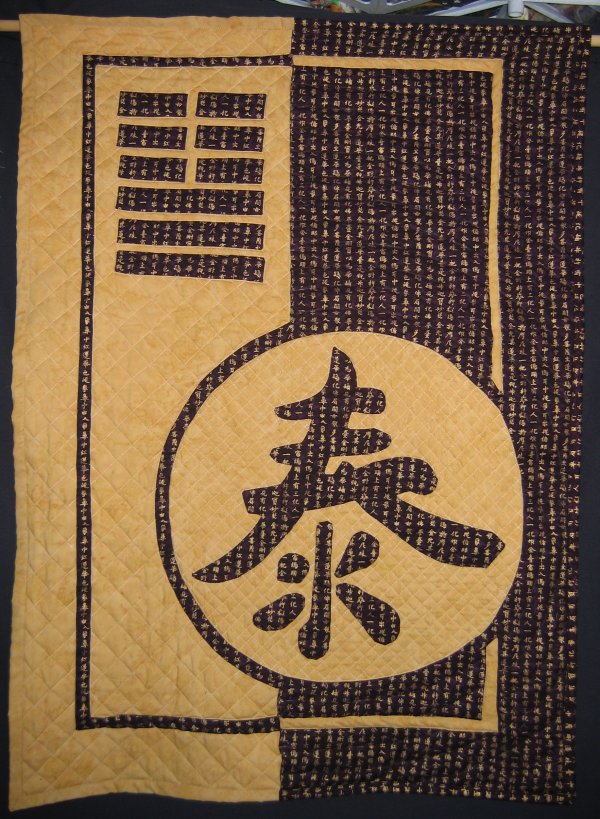
size: 24" x 36"
I must preface this with the statement that prior to *successfully completing* this project, applique was a 4-letter word in my vocabulary and I Did Not Speak It. I've always greatly admired humungously appliqued pieces, but from afar and without feeling the need to immediately go out and do it myself.
But, at a quilt show (at this point, I can't even remember if it was a recent one or not), I bought this wall-hanging kit. I loved the simple elegance of the design and the gold & purple fabrics included in the kit. And *even though* it was applique, I felt compelled to purchase it. It must have been fate.
This pattern has 3 different methods to attack the applique and I chose to use her method of basting
the applique fabric to the background and then cutting away the unneeded fabric. The beauty of this
method is that
Once the hand-basting of the shape is done ... oh. my. gosh. no pins to stick me! no pins to ambush my thread! no pins to fall out! no small pieces to lose! and it can be folded up without fear of dislodging the applique pieces! This technique is SO MUCH better than freezer paper, washable glue or any other hand-applique method I've tried over the years. It is *awesome* beyond words! I am dizzy with accomplishment!
I am so pleased to have been introduced to this technique. Applique is no longer a Forbidden Word in my vocabulary. :-)
This Forever Project #3 (which actually is turning out to be an Instant Project :-/ so I think I will rename this entire endeavor "Portable Project" instead)
This Asian design is by Pacific Rim Quilt Company, "Peace", by Nancy Lee Chong. It's part of her "2 Fabric Applique Quilts" line. The instructions detail how to do this by machine, raw-edge or hand applique. Because I want this to be a portable project, I elected to do this by hand. While I don't dislike hand-work, I really am not enamored of all the doggone fussiness of hand applique and all those small, individual pieces. Her technique, while not new to the hand applique crowd, was new to me and ... omigosh .. it's *fast* (as fast as hand applique can be done, that is). The drawback to this particular line is that it uses a LOT of fabric and a LOT of it is cut away, resulting (to my way of thinking) quite a bit of waste. The reason why she uses a lot of fabric is because, for her 2 Fabric Applique line, her applique fabric is the same amount as the base fabric.
Basically, it's needle-turn applique variation .. but I had never done it before. It's pretty slick. Doing some research, I found where you can also use this technique on smaller, individual applique motifs as well as on whole-cloth projects, such as this one.
You need to have the finished size of your applique motif on paper. Put the paper pattern under the applique fabric and by using a light box or taping the fabric to a window so you can see, trace the finished size applique motif on the applique fabric. (I used a chalk pencil which brushes away easily). Put the applique fabric on top of the base fabric. From the right side, hand baste through both layers exactly on the traced (i.e. the seam) line.
Now the needle-turn applique part comes in: you are going to cut away the applique fabric a seam allowance width from the hand basted line all the way around the motif. Starting at any point on the motif, remove about 1"-2" only of hand basting and needle-turn the seam allowance under. I still have the chalk line to see where the finished edge needs to be.
The nerve-wracking part is making sure you are cutting on the CORRECT side of your basting stitches! It's very helpful to have a drawing or picture of the finished project as a guideline to ensure that you aren't cutting away the part that needs to be kept!
This project finishes at 24"x36", so it's small and managable. There aren't a lot of small, intricate pieces to deal with. I was truly amazed at how quickly this hand stitching went ... after only 1 afternoon and 1 evening, it's almost done! What I found I really liked about this technique (basting on the finished edge line and cutting away the excess to leave only a seam allowance) is that there are NO PINS to stick me! You can fold up the entire piece and, if you're doing this with numerous small pieces, they STAY IN PLACE!
Based solely on the strength of this method, I am now working on my next Forever Project ... the hand-applique, "Monster Quilt" by Susan Garman, which is detailed on it's own page.
"Peace" now belongs to my favorite oldest daughter :-), who has always admired Asian-themed art work. I hope that once she moves to her next/new living quarters, she will actually discover where she safely packed it away and find a proper place to proudly display it. :-)