Fuchsias for Eddie and Anne
top pieced: August 2006
quilting finished: April 2009
 quilt size: 60" x 74" |
 throw pillow size: 20" x 20" |
quilt size: 60" x 74" |
throw pillow size: 20" x 20" |
The summer of 2006 found our oldest Dear Daughter, Catherine, working at Apple, Inc. in Sunnyvale, CA. I have a cousin, Eddie, who lives in Sunnyvale and I asked him if he could help me find a place for Dear Daughter to room. [Aside: are you familiar with the acronym, NARS (Not A Rocket Scientist)? Well, Eddie is not a NARS. Eddie IS a Rocket Scientist. An honest-to-goodness computer scientist who has written software that has been installed in Objects That Orbit the Earth. And a nicer guy you will NEVER find. Ever. Except for Mr. Pirate. :-) ]
Well, cousin Eddie knew that one of his neighbors regularly rented out a spare bedroom and discovered that the spare bedroom was vacant. Catherine & I visited the neighbor and Catherine decided that the rent was reasonable and the location was fantastic, being a very quick bike ride from Apple. Cousin Eddie also thought that it might be comforting for Catherine to know that relatives were just across the street should anything arise where she needed help.
When Catherine returned to school (CalPoly/San Luis Obispo, CA) for the fall term, I knew I wanted to make something for Eddie and Anne to thank them for their generosity and helpfulness. What better than a quilt? :-)
I knew that, at one time, Eddie was president of his fuchsia garden club (he could still be, for all I know) and he has fuchsias all over his backyard. I was exceedingly fortunate to find two fushcia prints that summer and quickly bought some, once again, without knowing exactly what I was going to do with it.
I was also ecstatic to find a retail embroidery design set of twelve different fushcias from Kenny Kreations. I can not emphasize enough how perfectly these flowers are digitized. I have a Janome 300e and every single design stitched out exceptionally well. I changed the colors of the embroidered flowers to coordinate with the fuchsia flowers in the print I used for the top.
As of this writing (April 2009), Kenny Kreations have not responded to my email concerning the availability of the fuchsia embroidery designs ... I couldn't find them on their site at all ... so I don't know if they simply aren't available any longer or if you would need to ask for them specifically.
Here are close-ups of two of the fuchsia designs:
  |
As you see, the layout I chose was a very simple 4-patch on-point with the fuchsias in the plain blocks in between the 4-patch blocks. There is one large outer border of the fuchsia flower print.
Although I completed the embroidery and piecing of the top by Fall 2006, for whatever reason, it got folded up and put away ... probably the annual tidying up for Thanksgiving. (having company over is an incredible incentive for cleaning up the public rooms, which also means a cursory tidying up of the non-public rooms so that junk from the public rooms can be stashed there until after the company leaves. :-) ) And having a 3 second memory in a 4 second world, I promptly forgot about the top.
Until early 2009, during an "organizational upheaval", I rediscovered the completed top. I absolutely KNEW that if I didn't get that top loaded onto Lizzie right THEN, it might be another 3 years before the top re-emerged. So, once I finished the quilt that was currently on Lizzie, I loaded the fuchsia flower top.
I was having some conceptual problems of how exactly to quilt this top. I knew I didn't want to do a pantograph. This was the first quilt for which I had some real emotional investment ... not that I didn't like my other quilts so far, but mostly they had been "practice" quilts of one kind or another. For those quilts, if the quilting didn't come out exactly perfectly, I wasn't overwrought with angst.
But THIS quilt needed to be nicely done. I didn't want my recipient thinking badly of me ... or wondering if I didn't think highly of him. After looking through a lot of my quilting design books, I finally decided that "less is more" and that an Orange Peel design would best set off this quilt AND not cause me undue anxiety.
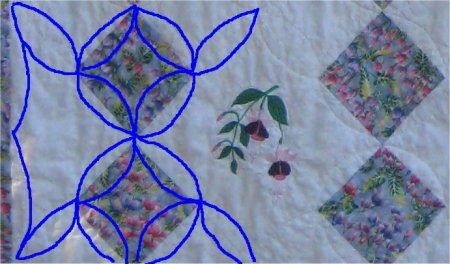 I have read a number of thoughts on how to best audition quilting designs. The one that stuck with me is quite ingenious: I took a digital picture of the quilt top. I printed the picture on a full page. I put the picture in an acetate report folder (the kind that kids use for school that have a plastic spine that slides along the fold of the folder to hold the pages in the folder .... but a page protector would also work nicely). Using white board markers, I simply drew on the acetate. If I didn't like the design, it was easily removed with a tissue.
 With this technique, I was able to mark a continuous line quilting path so that there were a minimum of breaks and all areas of the top were quilted. In that link you'll see 4 different colored paths: blue, red, green and yellow. This was my "road map" so I wouldn't forget where I was going, since I did the quilting over several days (due to unforseen interruptions).
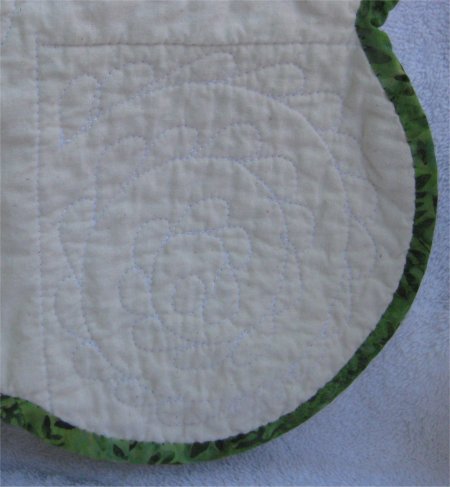
The actual curves were done using the acrylic templates that I had made at TAP Plastics for the swags on another quilt. I know that there is absolutely NO WAY I ever could have stitched such nice, even, consistent curves without the use of templates. I (heart) templates. :-) Once I laundered the quilt, it kinda sorta wrinkled up and the nice quilting lines are less clear BUT if you look up at the pillow at the top of the page, you'll see the Orange Peel much better.
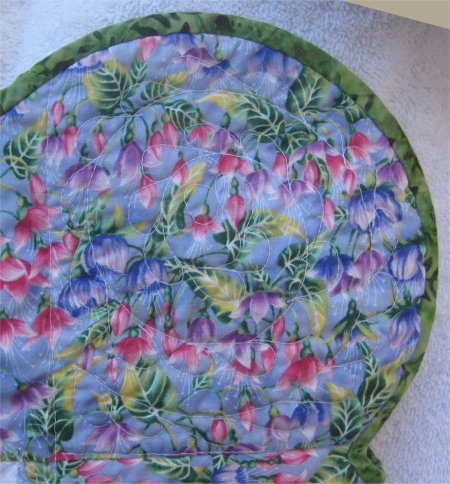
I also knew that the embroidered designs themselves needed to be outlined, since the area was too large to be without some sort of quilting. Once again, I used recently acquired tool, the Line Tamer. This wonderfully crafted tool allows me to VERY CLOSELY guide Lizzie around designs, such as these embroideries and appliques. I am simply ecstatic over how well this tool works. I (heart) Line Tamer. :-) If you look at the oval pictures of the fuchsias, you'll see the outlining that I did with Lizzie. And dagnabit! I think I did a credible job with Lizzie, perhaps not quite as good as with my sewing machine but wow, I'm pleased! woo hoo! :-)
The borders posed a different problem. Because the fabric is such a busy print, I knew that any intricate quilting design would be absolutely lost. As a result, I did one arch (to complete the Orange Peel curve) and then two parallel straight lines from the juncture of each arc out to the raw edge of the border. I was concerned that there wasn't enough quilting in the borders, as compared to the interior. In the end, I was right ... I should have put some more quilting there, but it wasn't really apparent until the quilt was laid flat on Eddie & Anne's bed and the edges cupped slightly. Ooops. :-(
In the corners, I decided to get a little fancy and used my spiral templates and put feathers on the spiral. Here's the front (where you can't see it very well at all) and on the back (where you can see it better).
  |
The straight edge of the borders seemed out of place; scallops were more appropriate, so I bought a medium value green batik to make bias binding. On straight edge quilts, I first sew the binding to the *back* then flip the folded edge of the double-fold binding to the front and top-stitch in place. Machine stitching the binding makes this part of the process go exceedingly quickly. However, I have yet to figure out how to machine stitch scallops that looks nice. So, I do scallops the traditional way: stitch the binding to the front, flip to the back and hand-stitch the binding in place. HOURS later, the binding was completed.
I had two extra embroidered blocks and two extra 4-patches, so I made a removeable knife-edge pillow cover (it has a zipper at the bottom), which used a darker green batik as the welting around the edge.
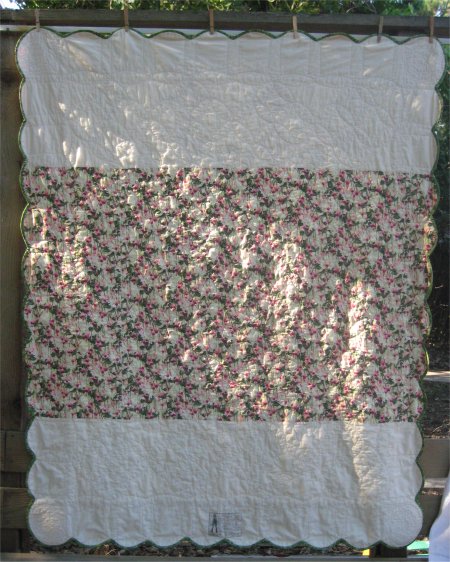 Way up in the begining of the page, I mentioned that I was able to find two fuchsia flower prints. Obviously the light lavendar background one was used for the top. The other fabric was used on the back. I do know that when I bought both of the fabrics, I hadn't intentionally planned on using either one of them as part of the backing. I probably was thinking of combining them on the front. But since I ended up only using one of the prints in the top, that meant that the other print needed to be used on the back. BUT .. you guessed it .. there wasn't near enough to use it by itself. I ended up pairing the quilt back with muslin and the pillow back with a white tone-on-tone. Additionally, I was somehow concerned that the back of the pillow cover wouldn't wear as well as the front, since it it wasn't quilted too .. so the back of the pillow cover got quilted with the Orange Peel design.
