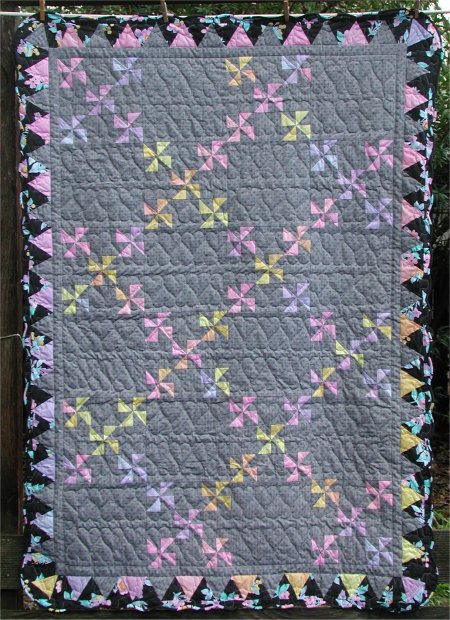
Aurora Pinwheels
Date made: January 2004
You are forewarned!! This is one of my LONG posts about how I came to make this particular quilt .. if you're not interested in the excruiating details [grin], just look at the pretty pictures. :-)
Around mid-October 2003, I bought a book, "Magic Pillows, Hidden Quilts" by Karin Hellaby from a forum member, RazzmatazzGurl. I had seen the book previously at a quilt show and regretted not buying it. The book is about quillows and the various pocket treatments for concealing the quilts. There was one pillow cover that especially intrigued me ... and I was very pleased that RazzmatazzGurl agreed to sell me her copy. Thank you so much, Denise! (No, I haven't made that particular quilt/cover yet!)
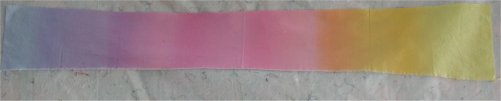 As I was perusing the book, not particularly intent on making any of them in the immediate future (after all, as long as I had the book, I could always make the quilt, right? :-) ), I happened to turn to a quilt made from RJR's Aurora Ombre line of fabric. I had seen this fabric at a quilt show and bought some yardage of two different colorways, not knowing at the time of purchase exactly what I was going to do with it. (I'm sure all of you appreciate the difficulty of figuring out how much of a fabric to buy if you haven't a clue what you're going to be doing with it) The fabric is *so* different from anything I had ever seen that I just knew that I had to have some. This fabric is manufactured to provide a continuous variation and gradation of color across the entire width. I knew that I needed to find a pattern that would showcase this gradual blending of color. The coloring of the fabric needed to be featured instead of the pieced pattern. And the book showed just such a quilt. I was very pleased because I could make this quilt RIGHT AWAY! I had everything I needed .. the Aurora fabric, the background, the batting and the backing! Hurray! The colorway I chose for this quilt went from pastel lavendar -> pink -> yellow.
Personal, rueful admission: ummm.... this wasn't the first quilt I made of this pattern from the Aurora line; the first one used a different colorway but owing to the fact that I inaccurately read the directions ... well, that's not *precisely* true ... I decided to make the necessary half square triangles using a different technique than the author used and so her measurements didn't apply to my method. Unfortunately, I didn't read carefully enough to register the finished size of the block so that I .. uh ... kinda made the first quilt overly large ... I'm still working on it. :-) In any case, once I realized that I had made a whopping BIG error in the size of the block, hence the quilt, I decided that I would start all over again with the second colorway that I had. I have to admit that when you read the ENTIRE instructions CAREFULLY you have a much better chance of your quilt being the correct size and having enough fabric! :-)
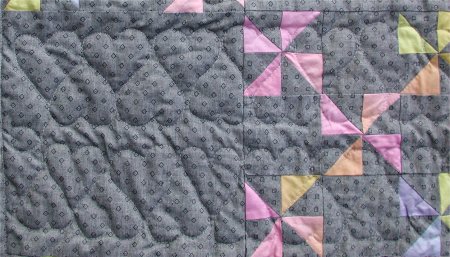
The basic block is a pinwheel made from the Aurora fabric and a background fabric. (The background fabric is a bedsheet, made in France, given to me years ago by a neighbor who decided she didn't want dark gray sheets. It has a very small repeating diamond pattern woven into it and is totally unlike any sheet I've ever seen here. The hand is wonderful and supple. Most definately NOT American-made sheeting.) The Aurora pinwheels are assembled into a 9-patch block. The 9-patch blocks are alternated with plain background fabric blocks. The end result is rather like a single Irish Chain, but with pinwheels instead of squares. The backing fabric is a lovely soft gray fuzzy woven fabric, that isn't exactly flannel and isn't exactly a "brushed" fabric either. I have no idea where or when I got it, but it was perfect for the backing, especially since it was exactly the size I needed. :-)
My quilt varies slightly from the one in the book. The book's quilt finishes off the "pinwheel Irish chain" with a simple border of Aurora fabric with a standard narrow binding. Once I had made the alternating pinwheel 9-patches and plain squares, I still had some of the backing and Aurora fabric left over, but unfortunately, not enough of either one to construct a border of just that fabric. So, I left (what became the center of ) the quilt up on my design wall for a while .. I needed to simply look at it and let the problem simmer on the back burner of my mind. Eventually, I knew I'd think of a solution. And I did. :-)
I decided that I would put a float border of the background fabric and then make a sawtooth border of the leftover Aurora and background fabrics. Originally I thought that one row would be of the Aurora and the other row would be of the background, but once again, I discovered that I didn't have enough of either to do that. After letting this problem simmer a bit more, I decided that if I could find another fabric that coordinated with the Aurora and background, I could alterate the Aurora & background as the first sawtooth row and use the coordinating fabric as the second sawtooth row. I rummaged through my stash and was absolutely DELIGHTED to find EXACTLY the right fabric for the coordinating row! Man, I couldn't have found a more perfect fabric if I had designed it myself! On the black backgrond were flowers of EXACTLY the same colors as in the Aurora colorway! This very dark fabric provided a wonderful contrast to the rest of the quilt without overpowering it.
Never one to leave well enough alone, I decided that I didn't want to have a straight-edged finish .... most of my quilts have just a standard plain binding and I was tired of it. So, I asked around the forum for help in figuring out how to achieve an "ice cream cone" look. Basically, it's a triangle with a scallop on the top, so that if held vertically, it looks like an ice cream cone w/ a scoop of ice cream. I wasn't sure at all how to go about creating that scallop look .. what was the technique or pattern one used for cutting out the sawtooth triangle w/ a scallop on the edge? From the very helpful Forum members, I was directed to the "Dear Jane" quilt. After taking a look at it, I realized that this was precisely the look I wanted and it was so easy! Using the same fabric as the outer sawtooth triangles, you sew a straight strip of fabric as an outer border. Then you cut the straight strip into scallops to match the size of your sawtooth triangles .. you don't do it the other way around! Gosh, that made it so much easier than first cutting scalloped pieces and trying to work with them!
 After some research, I found Linda Franz' website that describes in gnat's-eyelash detail how to bind scallops so they don't bunch, pucker or have tucks in them. I discovered that proper scallops do NOT have a miter at the inner point, but are gently rounded. Following these directions, I have successfully finished my quilt. I'm also amazed that I actually hand-stitched this binding down instead of my usual machine stitching! Well, all I can say is that this quilt seemed to call for it. :-)
 So, now that the quilt top was actually done, I was at my familiar point of trying to think of what kind of quilting motif to use. I am horribly unimaginative when it comes to the actual quilting. The long arm quilter I like to use is wonderfully creative in this area but I can't afford her for every quilt. :-(
 I finally decided on continuous line, interlocking hearts in the pinwheel part of the quilt, stitch in the ditch along the float border and a paper doll motif in the scallop border.
Why a paper doll? Well.... the head of the doll nicely fits in the scallop and the body narrows down to fit into the sawtooth triangles. :-)
I actually MADE the paper dolls out of Contact paper and used the stickiness of the Contact paper to temporarily hold that pattern to the quilt while I free-motion stitched around the perimeter.
When I came to the end of the Contact paper pattern, I just pulled it up, restuck it to a new area and continued stitching.