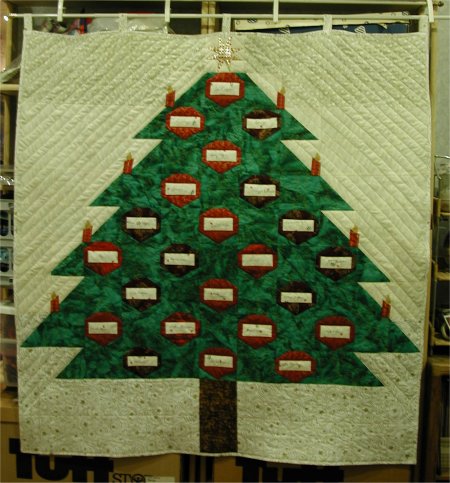
Christmas Ornament Signature Wall-hanging
Date made: December 2001
I've mentioned in the other pages that my focus was to finish up my UFOs and WIPs so that I can then start on any one of my stockpiled projects without excessive guilt feelings. I have quite a backlog of UFOs, so WHY I decided to do a last minute Christmas project is beyond me. I don't think I want to know the psychological rationale behind it. :-)
About a week before Christmas, I had been perusing my computer quilting files for something, that something now being long forgotten. In my diretory of interesting projects to do "sometime", I rediscovered a paper-pieced pattern for a Christmas tree ornament that was designed to be a signature block [available at Linda DeParro's former Geocities website]. After you have everyone sign an ornament, you assemble them all in a Christmas tree wall-hanging. I decided that I had enough time to make all the ornaments I needed for both my side of the family and Mr. Pirate's family to sign. When done, I could have a really nice family memento. :-)
In keeping with my other self-imposed restriction of trying to use up my stash for anything new I might make, I was able to make this top with only my stash fabrics. The background is 3 different white-with-gold designs. I didn't have enough of any of the 3 to do the entire background, but by using them all, I had enough. The ornaments themselves were done with different red-with-gold and maroon-with-gold fabrics. In fact, the red-with-gold fabric is leftover from 2 other projects that I had done over the years. [ I think I might be running out of the red-with-gold now. :-) ] The signature part of the ornament is a Daisy Kingdom leftover ... a Christmas bears and heart motif on off-white. The tree itself is a mottled green that kinda/sorta looks like green crumpled paper. The star at the top is leftover from a holiday top I had made for myself many moons ago and has metallic gold/red/greens.
So, I steadily made ornaments for the family members who were going to be present on either Christmas Eve (my side of the family at my house) and Mr. Pirate's side (at his Mom's house on Christmas Day). Digression: then I realized that although I had purchased flannel for Christmas jammies for my girls several months ago, I hadn't actually ever gotten around to *making* the jammies .. cuz Christmas was so far away. [sigh] Well, I was able to make 2 sets of jammies and all the ornaments before Christmas arrived.
I had originally thought to construct the entire top so that the signees could see the (almost) completed project. But if someone really messed up their signature I'd have some ripping to do to put in a new block. So what I did was to put each signature ornament block, ironed onto freezer paper for stability, in an embroidery hoop and let them sign it that way .. *after* practicing on a scrap piece of fabric first! :-) Although my side of the family is used to seeing my sewing projects, Mr. Pirate's family isn't. Eventhough they are aware of projects, it was still an interesting experience to explain to everyone (especially Mr. Pirate's side) exactly why I wanted them to sign fabric .. and what I had in mind for the finished item.
After Christmas, I cut out the plain fabric blocks that were to alternate with the signature blocks and cut out the blocks for the HST at the outside edges of the tree. I made the HST blocks (using the technique that produces 2 at a time) and started to assemble the rows. Now this is where I realized that my plain blocks weren't matching my signature blocks. And the HST blocks weren't the correct size either. This was a *real* problem because I had literally used up *all* of the green material and had no more for corrections. The plain blocks couldn't be recut to the correct size because the proportions were wrong. Ditto with the HST.
 I was really puzzled how this was happening. I looked back to the paper-pieced pattern for the ornament and discovered, much to my horror, that I had neglected a small-but-significant rectangle on the top of the ornament, which was the "hanger thingy" segment and would have made my ornament blocks *square* instead of the rectangle that they ended up being. It's obvious to state that as I was making them, I didn't notice that the blocks weren't square.
Then I discovered that I was short of the 2 plain green squares and I had NO more green fabric left, except for the scraps I had cut off during the construction of the ornament squares. It wasn't an option to rip and substitute different greens, so I decided to make lemonade from the lemons that I had. :-) I went thru my scrap pile and gathered up all the *small* (and I do mean small pieces of green scraps and sewed them together crazy-quilt style to construct the two plain blocks that I needed. The saving grace was that since the green has a *very* mottled design, unless you are up-close-and-personal with the quilt, those constructed "humility" blocks aren't really noticeable, especially since there is an overall quilting motif.
 And then to top it all off, since the HST blocks weren't the right size either (and couldn't be corrected), the intersections where they met at the outer edges of tree were HORRIBLY off.
*This* was really a mess; even more awful than the plain blocks being the wrong size. There was *no* way to correct the HST blocks. But not finishing the quilt wasn't an option either ... so as I kept constructing the rows .. and as I kept doing the quilting from the back ... I was thinking of how to best solve this problem .. cuz *something* needed to be done.
It hit me then, that since I couldn't properly correct the problem, it would have to be disguised! This would be a cover-up worthy of Watergate .. worthy of Lewinsky-gate .. worthy of Tammy Faye Bakker's makeup! (well, maybe not THAT worthy). :-) I appliqued candles over every single gawdawful mismatched HST intersection. :-) To tell you the truth ... it even looks like I originally planned for the candles to be there. :-)
I was *very* lucky to have dodged that bullet! :-)
While I was able to make the top from stash fabric, I really didn't have any substantial leftover fabric to piece together a backing. It just so happened that JoAnn's was having a sale going on (snarf) and I was fortunate enough to find a suitable backing for $1.49/yard! I also had it in my mind to try a technique that I had seen in the past several quilt shows and now know there is a book on this technique .. quilting from the back.
Basically, what you do is to outline stitch the fabric motif that is on the backing without regard to where it goes on the front side. You are using the printed fabric as your quilting guide so you don't have to mark it. Now, since I had distinct areas that I absolutely did not want quilting to be (the signature ornament area), I read in the book that you stitch-in-the-ditch around all such areas. This defines them on the backside so you can see these areas to avoid when you are doing the general quilting.
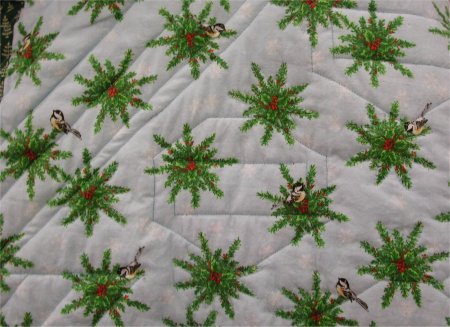 The fabric I bought for the backing had an overall design of round wreaths.
After outline stitching the ornaments and the outer edges of the Christmas tree, I free-motion stitched around each wreath that didn't intrude on the ornaments. I ignored the center hole of the wreath.
On the backing side, I used thread that matched the background color; in the bobbin, which is what was going to show up on the front of the quilt, I wound a shiney yellow-gold rayon thread. My first choice was for gold metallic but I discovered that my machine doesn't like metallic thread in the bobbin. The rayon turned out to be a good choice after all.
Since I didn't stitch the center hole of the wreaths, the motifs on the front of the quilt look like multi-pointed stars or snowflakes. You really can't see the outline stitching of the wreaths on the backing .. but look again at the front detail picture .. *that's* where the wreaths are! :-) I really like the way this turned out.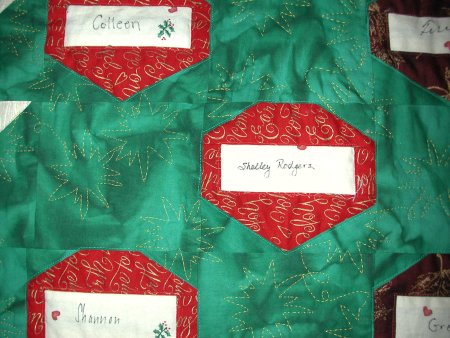
For the background quilting on the front, I echo quilted parallel lines ... duplicating the outer edges of the tree.
So, I am very pleased that this very last minute project is completed. I really had no right to have even thought of it, but I'm glad that I did. Now, I need to finish up that 3rd jammie set. :-)
Addendum: since some time has passed from when this wall-hanging was completed, new family members have been added, either through marriage or births. My oldest daughter (she who is so clever) suggested that since I can't add more ornaments to the tree, I could start appliquing presents, with the appropriate signatures, under the tree! What a neat idea! For the new babies, I could print their names myself, wait until they are old enough to write their own and then replace the signature area.