City Fish Stack-n-Whack
Date made: December 2000 through March 2001
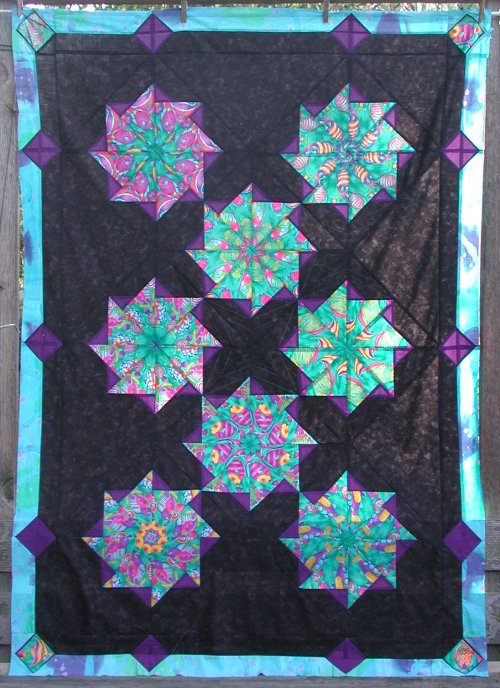
This is another Stack-n-Whack quilt, very similar to the first one I made in the winter of 1999 (just a couple of months previously). A online computer friend of mine from New York City came to visit me and I showed her my first Stack-n-Whack. She just loved it ... and I was tempted to give it to her right then. But, gosh, ya know? I had just finished it a couple of months earlier and it was the first quilt that I had intended on keeping for myself in quite a while. So, I kept it. :-)
However, when I was cutting out the triangles for my first Stack-n-Whack, I had enough left over to make another one, which I had fully intended on doing "someday". Well, "someday" arrived. During March 2001, I'm flying out to New York City to visit my computer friend and decided this was the opportune time to make that second Stack-n-Whack out of the extra triangles.
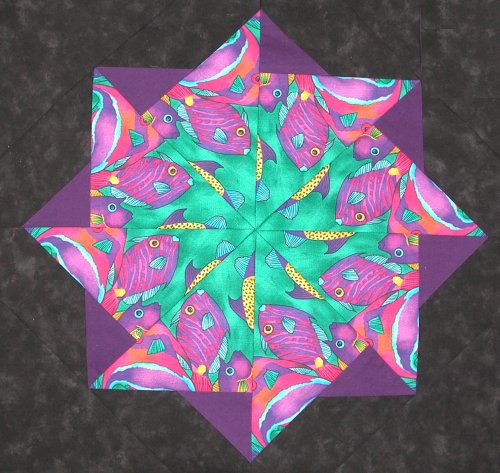 I used Bethany's "Pinwheel Plus" format this time (the pinwheels have an extra triangle of color at the tips of the background fabric) but in a twin size instead of the throw size she has in the book.
But, I messed up on the borders .. I didn't read through her directions completely and didn't realize that the corners were to be mitered. I have no problem with mitering corners .. I rather like them .. but I had already cut out my border strips when I discovered the miter stuff. Well.. rats.
Upon reflection, I decided that I would turn this lemon into lemonade by putting in fussy-cut square-in-a-square corner blocks. :-) The fussy cut would be of the tropical fishes of the pinwheels; the corner triangles would be the black background of the quilt.
Sketching out the quilt, I figured out the size of the corner blocks, cut and sewed them. Imagine my surprise when they were too large for the border strips! Gosh, who woulda thunk it? This time, I measured the *border strips*, discovered my mistake. Time to do some judicious frog-stitching (rippit! rippit!) ... then recut & resewed.
When I put the borders and corner blocks up on my design wall, although the corner blocks were a perfect fit this time, I discovered that the four black triangles of the corner blocks didn't look quite right, due to the makeup of the borders.
So, I frog-stitched them again and recut/resewed 3 of the corner triangles in the outer border fabric. That looked
better with respect to the borders, but now the tropical fishy was lost in the similar shades of the 3 new corner
triangles. The fish needed a black accent strip inside the new corner triangles to set it off. [sigh]
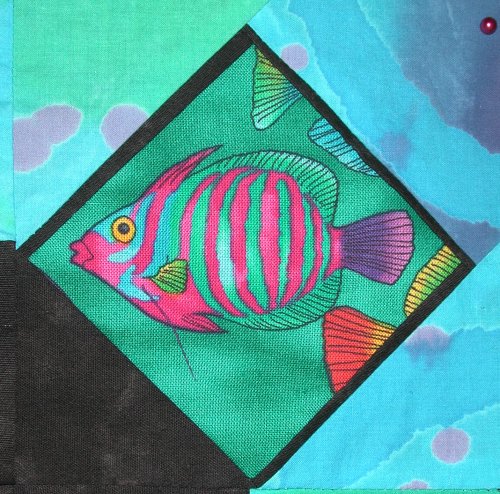 Resolutely, I frog-stitched those crummy corner blocks AGAIN. Cut and sewed a black accent strip with the
appropriate corner triangles. They look much, much better than average. :-)
Resolutely, I frog-stitched those crummy corner blocks AGAIN. Cut and sewed a black accent strip with the
appropriate corner triangles. They look much, much better than average. :-)
This was my first "real" attempt at machine quilting, both straight line (other than stitch-in-the-ditch) and free motion. I took the straight-line quilting motif right out of Bethany's book for the Pinwheel Plus quilt.
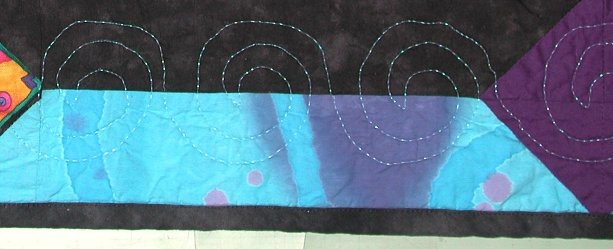 Since the border is made of two fabrics, I chose a swirl design that straddled both borders. This was the first free-motion that I did .. and this was done on my home machine. Heh .. it shows at times, too! The swirls are not exactly perfectly round at times and they sorta wobble at times .. but, ya know? I'm happy with my effort.
I used a daisy petal design for quilting the actual pinwheel Stack-n-Whack blocks .. and that was a real eye-opener. The length of the pinwheel block from center to tip is about 8". I discovered that this is a *very* long distance for me to be free-motion quilting (on the home machine)! My petal stitching isn't exactly smooth in places, but overall, I'm pleased with the effect.
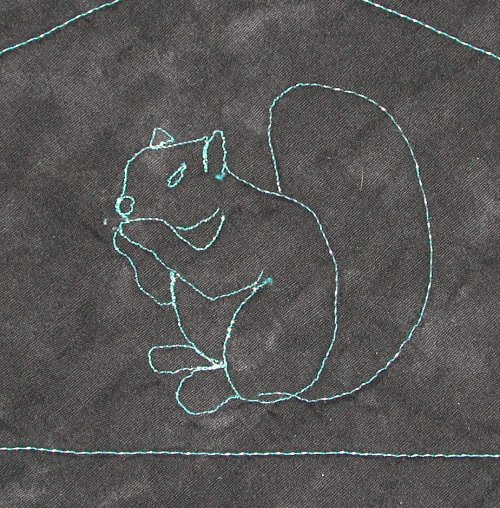 The pičce de résistance is the squirrel motifs I did around the perimeter of the black center. One of my friend's online nicks is "squirrel". I had wanted to incorporate that somehow into the quilt, but a paper pieced block really didn't go anywhere. I looked around the 'Net until I found a squirrel picture that I liked, traced the outline and copied it onto thin paper. I used the copies as a quilting guide .. I pinned the paper right onto the quilt and stitched right thru it. More or less, it worked like a champ! I did have to figure out the "best" way to do the stitching so minimize the start/stops and/or back-tracking.
For all the quilting on the front, the thread I used is by YLI Corp, their line of reflective quilting thread (blue #003). It's an irridescent sort of light blue thread .. the way water sparkles in the sunlight. The bobbin thread was turquoise cotton thread, to match the backing fabric.
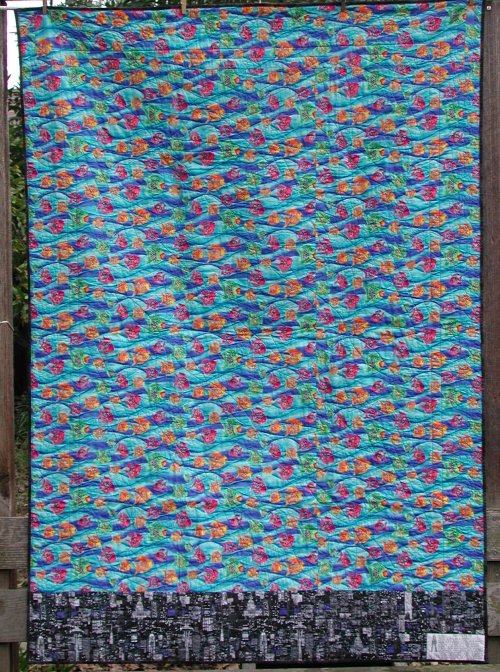 And why, you may ask, is it called City Fish?? Well, because my friend is *strictly* a big city kinda gal, I put a strip of city-scape material on the bottom of the backing. It shows various recognizeable landmarks from different cities during the nighttime, so the fabric has silver metallic running thru it. One of the landmarks is the Statue of Liberty. :-)
And why did I put the cityscape at the bottom of the backing? Ahhh.. that is so very simple, don't you see .... all of her perverted computer friends (including, of course, moi) like to congregate at the bottom of the gutter. Gotta love the symbolism at times, ya know?
I hand-carried the quilt with me. I truly am very relieved that I did not have to be mailing the quilt to her. I have this paranoid fear of something like this being lost in the mail.