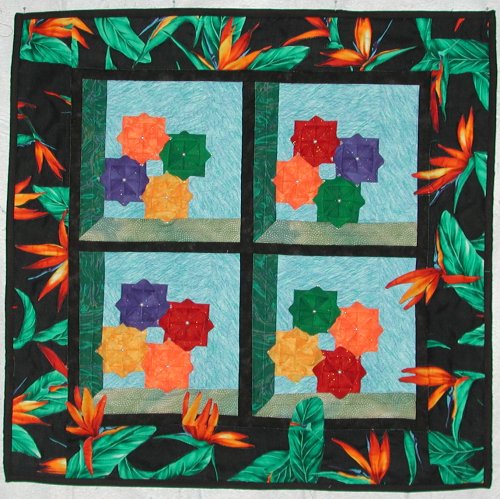
Fantastic Folded Flowers
through the Window
Date made: November 2000
In Walnut Creek, Thimble Creek is the most wonderful quilt shop. In the Winter of 2000, one of the classes they offered was a wall hanging, taught by Karen Boutte (a wonderfully amusing and informative teacher), from the book Fantastic Folded Flowers by Rebecca Wat. The instructor's sample was the most incredible Asian floral print and I fell in love with it. I signed up for the class and immediately went home to dig through my stash for suitable fabric.
Since I do have a sizeable stash, I try to use as much of it in whatever project I'm doing, so as to justify its existance. (smile) Honestly, although some fabric is simply too wonderful to be actually used, what good is a stash unless you're going to show it off in a project?
I found some great tropical Bird of Paradise print on a black background that would be perfect for the border. I don't remember buying it, so it may have come from my mother's collection. It also didn't feel like cotton, another reason I think it was my Mom's. It ravels very easily and is very, very, *very* soft. Working with it was like working with Kleenex (.. uh.. the unused kind. :-) ) But it *did* have all the elements that I wanted for the border, so I used it. From a previous buying expedition at some quilt show, I had obtained some incredible jewel-toned, glittery solids that exactly matched the Bird of Paradise flowers, so they were to be used in the folded flower part of the quilt.
The sample of the wall hanging in the book described this project as reminiscent of looking at flowers through a window, but had simple blocks of fabric inside the sashing. I thought about the description and decided that if looking through a window was the intent, then I would use the Attic Window block to actually make windows. I had some dark green hand-marbled fabric in my collection that would do nicely as one of the window frames.
I still needed fabric for the folded flower background and the second window frame, so a shopping excursion was required. Gosh .... what a hardship. (grin). I found some great blue fabric that had diagonal lines through it and some medium green that would play nicely with my other fabrics. What I didn't realize at the time was that the diagonal lines in the blue fabric would cause me design concerns later on.
To complete the wall hanging, I used a mottled black fabric from my stash as the outer window sashing and plain black fabric as the binding. Although I normally like to use related or unusual fabric for the backing of my quilts (so that the reverse is as interesting as the front in its own way), since this was a wall-hanging, no one was ever going to see the back. I decided that a solid sea-foam green fabric from my stash was suitable for the backing.
The focus of the quilt is obviously the folded flowers. In essence, they are fabric origami. You might remember the paper "cootie catchers" or "fortune tellers" that you may have made from paper in grade school, well, this is them in fabric. :-) Once you get the knack of folding the fabric and catch-stitching the center fold down, they go rather quickly.
In the class, after an initial verbal instruction and demo by the instructor, we got down to making at least 4 flowers so that we could construct at least one block in class. Everyone had a different interpretation of the flowers, based on their border fabric. Some used a scrap fabric theory: every flower was a different fabric. Some used Fall tones; some used Spring. Every one was just beautiful. It was as I constructed my own block that I realized the diagonal lines in my background fabric was presenting a layout problem. Because of the direction the components were cut, the diagonal lines were not consistently in one direction ... something I didn't realize until the block was completely sewn.
Constructing the block, while not difficult, was somewhat persnickety and I did not relish becoming good friends with Jack at this time to do some frog-stitching (you know .. Jack the Ripper ... "rip it, rip it"), so I left the background as it was. Being the anally-retentive person that I am, I was somewhat annoyed that all the diagonal lines weren't nicely lined up ... but the instructor commented that she rather liked the random pattern, as it reminded her of falling rain. Wow!! In my narrow mental box, I hadn't considered that viewpoint .. and by golly ... it sure did kinda/sorta look like a gentle rainfall. Oh good!! I didn't have to redo that block nor be concerned about cutting the rest of the background pieces. I was very pleased.
Back at the ranch, I put this project on hiatus, as other things in Real Life had a higher priority. I also wanted to take a machine quilting class before attempting to do the quilting myself. Later on in the first quarter of 2001, Thimble Creek offered a machine quilting course which I did take. The top was eventually finished and machine quilted by me. I outline stitched (stitch in the ditch) all the horizontal/vertical seam lines to stablize the quilt. Then, taking a huge breath, I started stippling the background fabric.
This was a major source of stress for me .... you see, to have stippling look nice, think of brain convolutions or intenstines. Nice image, huh? (grin) It's random. There is NO pattern ... the stitches just sorta wander all over but according to some rules .. no crossing over each other; no obvious sectional stitching .. they should look rather like jigsaw puzzle pieces. It was the very randomness of the stitching that was giving me conniption fits .. I don't do random. I'm not a random kinda person. (sigh) But, I did give it the old college try and I think I did a credible job. Whew ... I don't know if I'd care to do an entire quilt like this!
One detail that I added that wasn't in the book, was the dimensional applique of the Bird of Paradise flower petals on the lower and right-hand side window frames. I wanted to strengthen the illusion that this really was a window. I fussy-cut petals of the Bird of Paradise flowers so that, when appliqued, they would continue the flowers that were cut off on the lower and right-hand side borders. The result (I hope) is that they look as though they are in front of the window frame. Keeping the flowers of the upper and left-hand side window frame cut off, furthers the illusion that they are behind the frame.
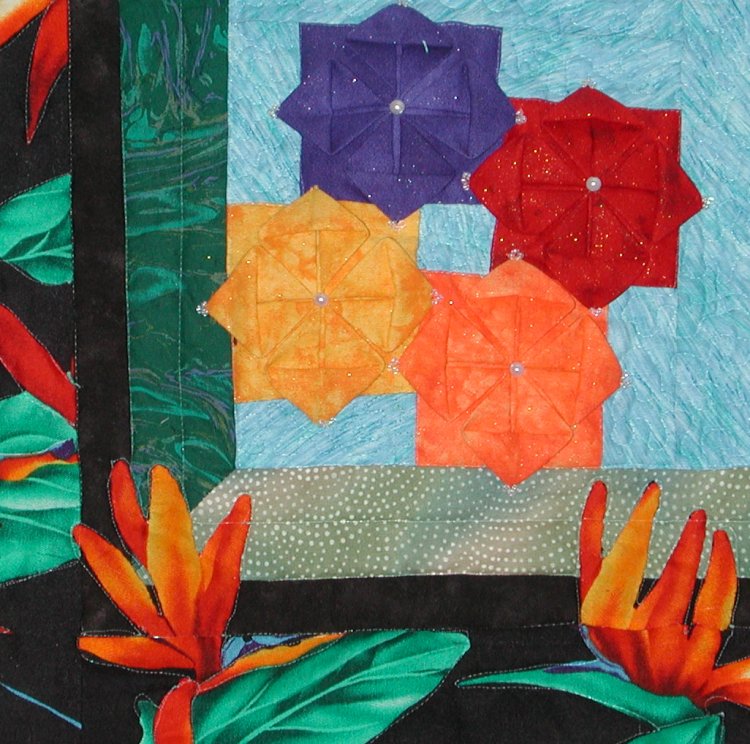 I outlined quilted each of the flowers in the border. All quilting was done in clear monofilament thread. Each folded flower received a pearl in the very center and 3 clear seed beads sewn to each flower tip. The resultant quilt is now hanging in my sewing room .. yes!! I am keeping this one for myself!! .. and is approximately 27 inches square.
In an interesting footnote, on one of my expeditions to Thimble Creek on another foray, I looked around for the instructor's sample wall hanging, just to refresh my memory of what the class was going to be making. I couldn't find it. So, I asked an employee if it had been removed and was told that the instructor was displaying another version and directed me to a sample that featured an African animal border print. I was astonished. While very nice in its own right, quite honestly, if I had seen this one first, I never would have signed up for the class. It was while I was in the class that some of the other students mentioned it was precisely that African motif that caught their interest and prompted them to sign up for the class. What a wonderful example of how starkly different versions of one quilt will appeal to a vastly different audience .. and how each quilt turned out so wonderfully.