Machine Embroidered Pillowcase
One of the items on my long-time UFO (UnFinished Objects)List has been to make pillowcases. They've been languishing there; they are so simple to do, I tend to just put them off. But, I was at a convenient breakpoint from making quilts, so I decided to get this item done.
I follow my own practically perfect directions :-) (which are freely available as a PDF) And just why they are Practically Perfect?
Well ...
Like so many other seamstresses, I've made my share of special pillowcases. I've used many different directions with many different techniques. Over the years, I have cherry-picked the best pieces of all of them into my own set of directions, so that *I* am happy with the finished pillowcase. What I like about my directions are:
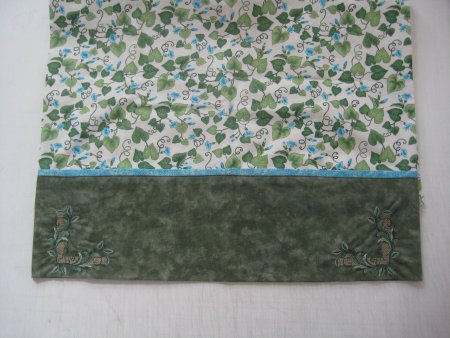
All the seams are finished or enclosed. I HATE, HATE, HATE seeing the seam allowance showing at the edge of the pillowcase. It looks UGLY. Yes, it's faster to sew the decorative band on first then do the side seam, but if you're making something, why on earth would you want to make something that doesn't look nice?? If you're under a time constraint and can't get a beautiful gift done on time, give the recipient an "I owe you one pillowcase (in progress)" coupon. Or start sooner. :-) The accent strip is a separate piece of fabric, allowing you to coordinate it with the body and the bottom band. I've used directions that use a tuck for a faux accent strip. That works, of course, but I like the accent strip to be noticeable. I have been taught to make the inside/reverse of something as beautiful as the outside (or as nearly as I can). It's a matter of pride in one's work. Yes, it does take a little longer, but the result is a finished item that you can be proud of. You never look at it and say that you should have done it better. Therefore, I use French seams on my pillowcases. There's no trick technique or fancy smoke-and-mirror procedure. It's all just basic sewing. Best of all, I use the full width of fabric for my pillowcases. Most directions I've seen have you cut down the yardage to 40" wide so that you have a 20" wide pillowcase. That leaves you with a skinny,lengthwise strip that is practically worthless. I hate that! So, I use the full width of fabric and my pillowcase are just a skoosh wider ... no waste. :-)
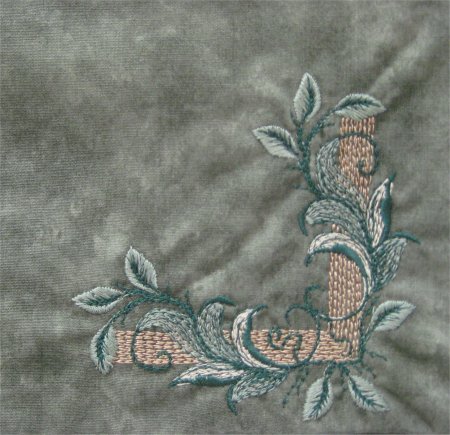 Because the pillowcase band is essentially a solid fabric, I decided to embellish it with some machine embroidery. The motif I chose is a sample from the very talented Sadia Andrews. This sample is available from her Yahoo group "Sadia's Designs" in the 2007 Free Sample file. Sadia's designs are simply superb; they are beautifully digitized and stitch out wonderfully.
With the colors that I used, the design is subtle yet satisfies my urge to decorate every living thing in the house with embroidery. :-)
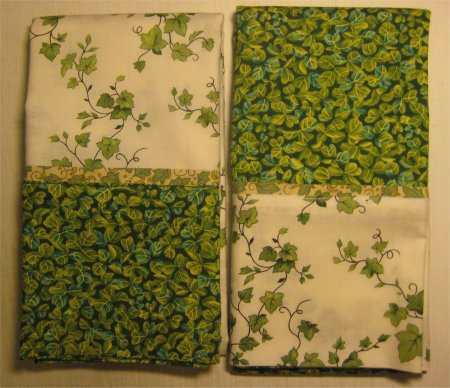 The other two pillowcases don't have embroidery embellishments, as the fabrics I used are much too busy to showcase anything.